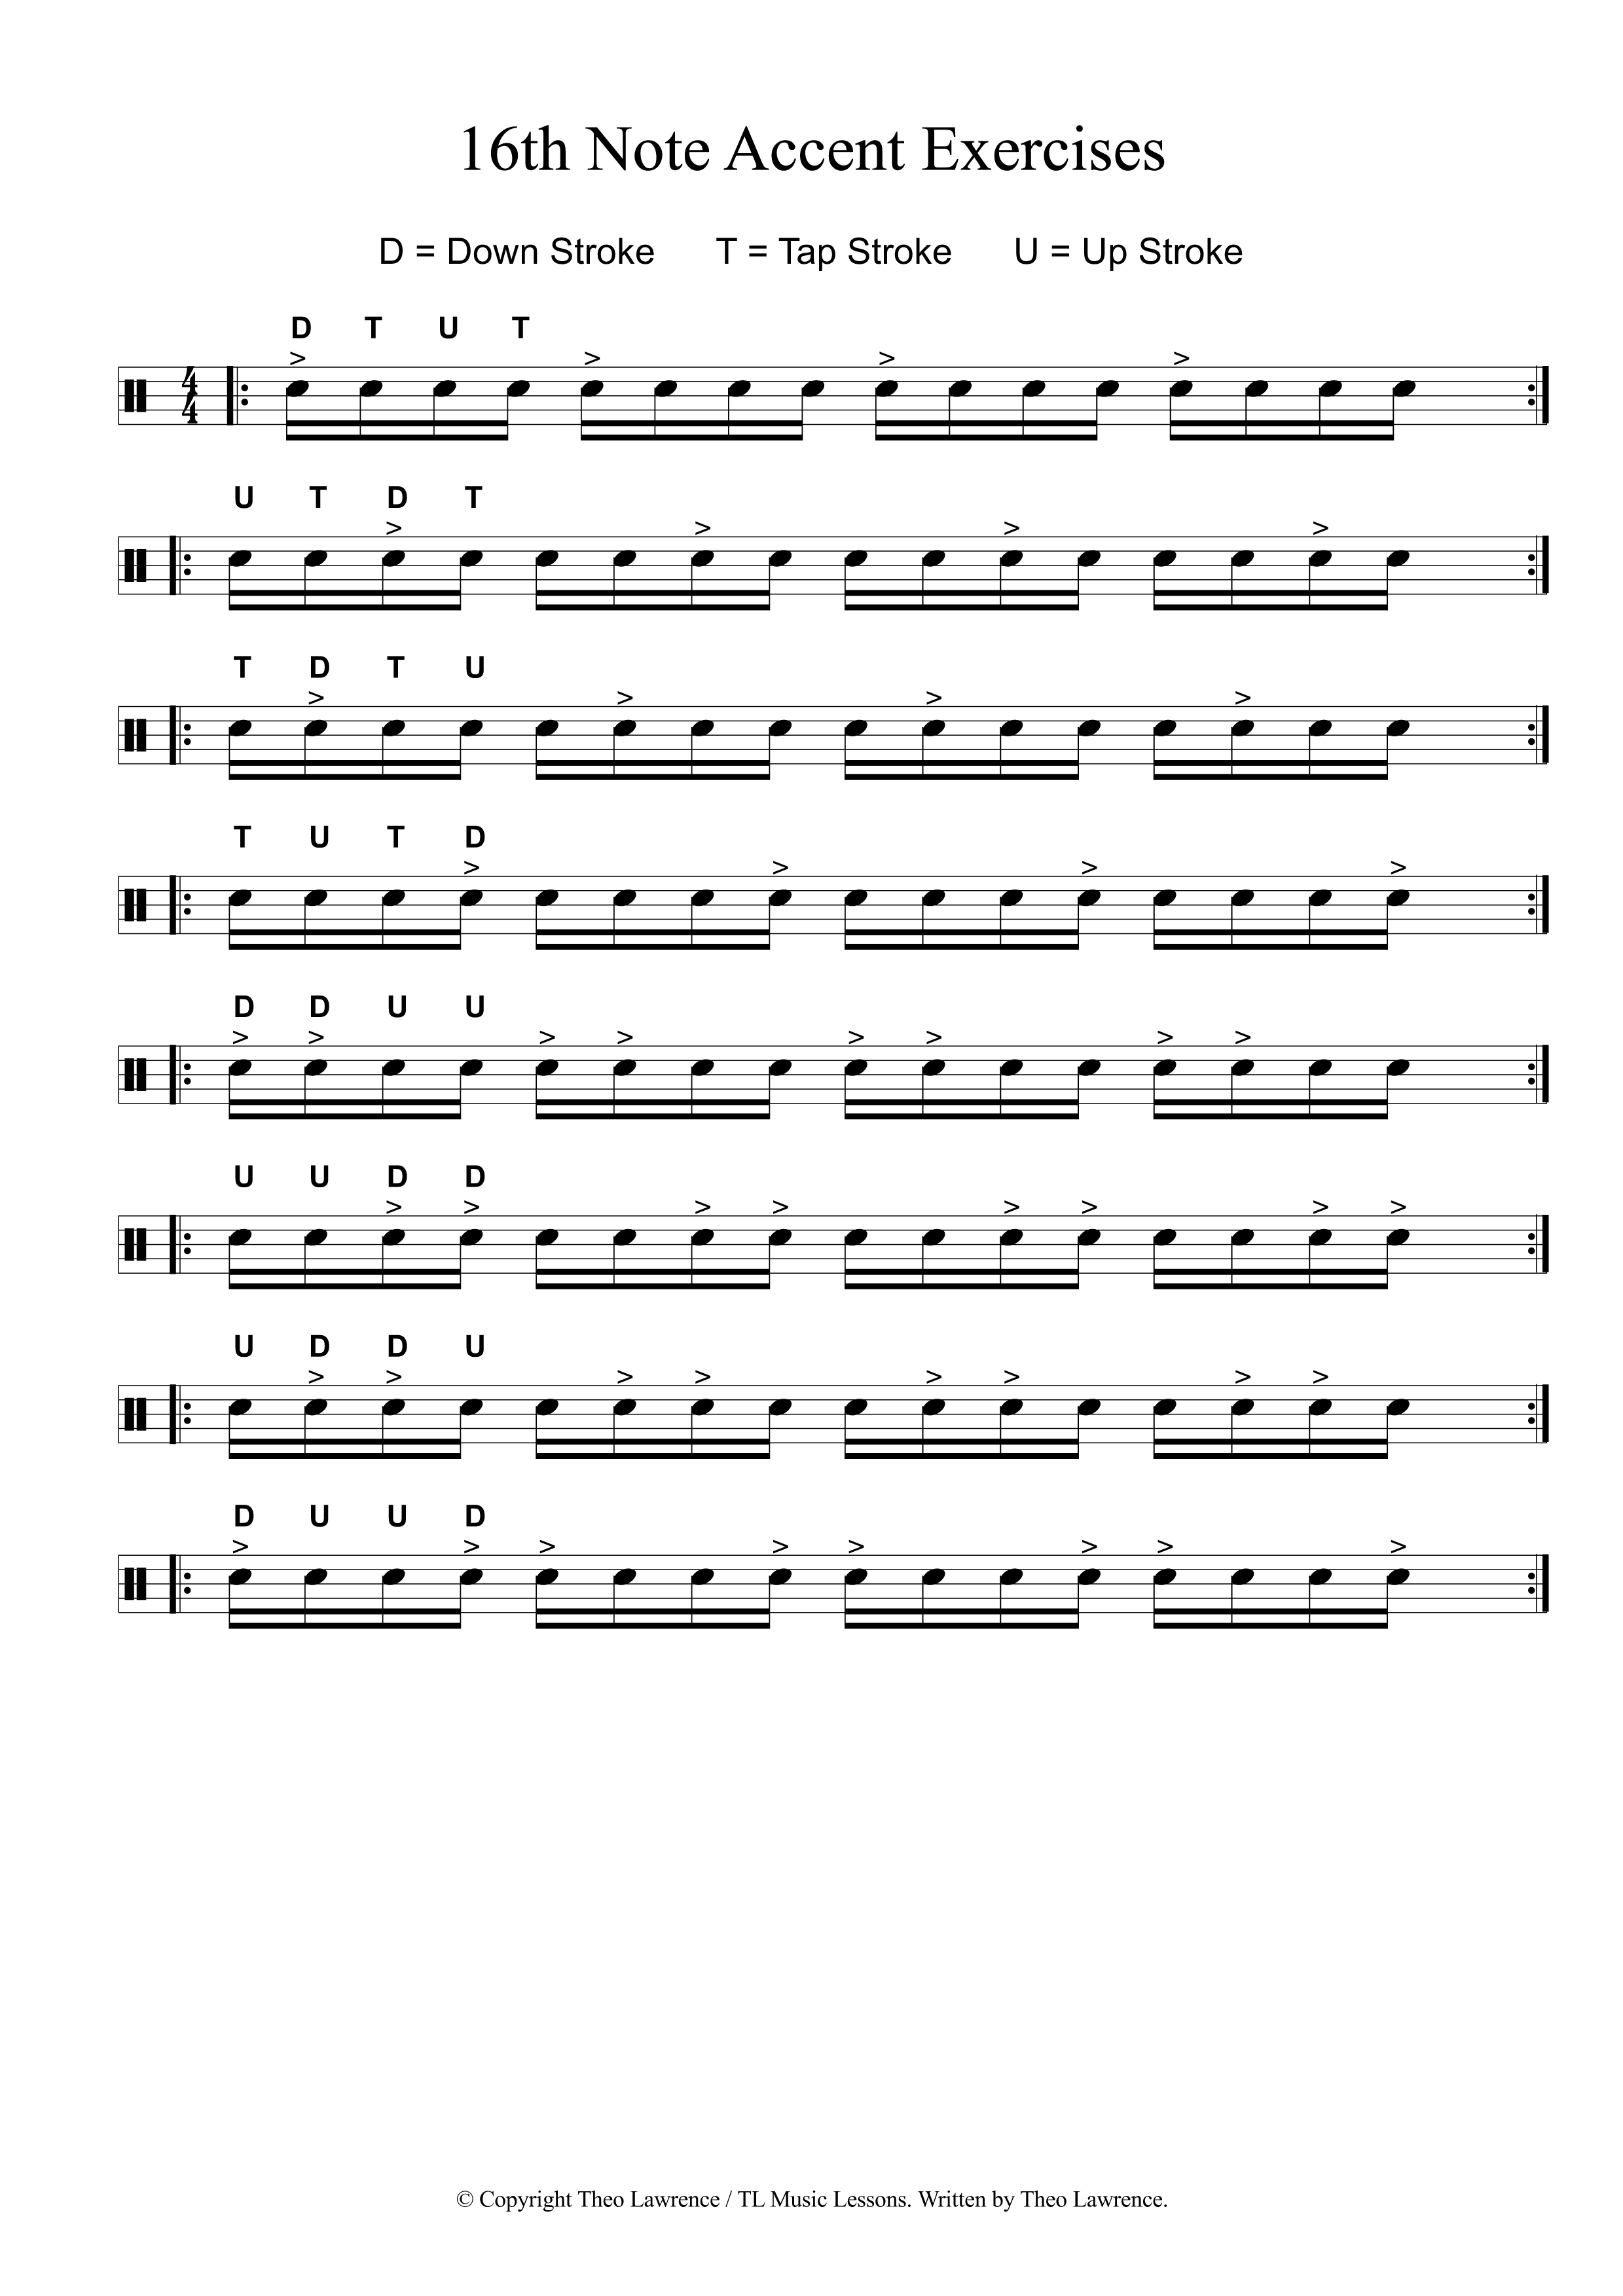
What happens when you opt for gaffa tape instead of bass drum impact pads

Having visited various rehearsal studios around the UK, I have seen this happen so many times.

I believe that it is a common thought to skimp on buying a bass drum impact pad, and choose gaffa tape instead. Please don’t do this!!

The idea of the pads is to prolong the life of a bass drum skin, by adding an extra layer of material where the bass drum beater hits. The problem with using gaffa tape (aka gaffer tape, duct tape), is that it wears away very quickly and becomes extremely sticky after a day or so of drumming. This then causes your bass drum pedal beaters to stick to the drum when playing and leaves a residue on the beater heads. After the stickiness has worn off, you can play the bass drum like normal again without it being an issue.

In conclusion, putting gaffa tape on a bass drum skin only serves the purpose of wrecking the aesthetics of the bass drum skin, and spoiling the surface of your bass drum pedal beaters, and perhaps prolongs the life of the bass drum head by approximately 1 day.

16th Note Hi Hat Grooves With Accents

Here we have very basic snare and bass drum grooves, with challenging accented 16th note hi hat accent rhythms.

The Hi Hats should be played with 2 hands, with the leading hand moving over to the snare drum on beats 2 and 4.

Tip: You could play the accents on the Hi Hat edge, and the non-accents on the top of the Hi Hat, for a really good contrast in volume and tone.

These drum beats are good to play after spending some time working on the more rudimental type 16th note accent snare drum exercises like Accent Techniques – Down, Tap, Up, Full Strokes and 16th Note Accent Exercises ebook – 10 pages.


Related (Premium): The sheet from this post is included in this ebook – Grade 4 Drum Book with 17 Drum Lesson Sheets
Related: Accent Techniques – Down, Tap, Up, Full Strokes

How To Tune Drums – Exam Question

When tuning your drum skins you need to make sure to tighten the tuning pegs evenly (1/4 of a turn each time). In addition, make sure to tune the pegs in the correct order (see picture below) so that the tightening pressure on the drum head is distributed evenly. The key word to remember here is ‘Star Shape‘. This is the word that they look for in drum exams, (rockschool) when asked in the general musicianship questions.

You should ideally tune your drums regularly to keep them sounding nice.

Q: How do you tune a snare drum?

A: In a star shape, tighten or loosen the lugs with 1/4 turns or less until you reach the sound you are looking for.

Q: How do you replace a snare drum head?

A: Loosen all the lugs and take them out before taking off the snare rim and the old head. Clean out the snare if needed, then put the new snare head onto the drum, and then feed through the metal lugs and finger tighten them. Press down in the centre of the head to settle it into place. Next go round the lugs in a star shape tightening with quarter turns. After a few times around the star shape press the head again to stretch it a bit. Tap next to the lugs and make small adjustments if some sound tighter than others. Then keep going around in the star shape with quarter turns until it’s sounding how you like it. Finally push down hard in the centre for a couple of seconds, and then fine tune the lugs with tiny turns if you think they need it. Tap next to the lugs to check if any are too tight or loose.

Touring

When you set up your drums for a show, make sure to fine tune the drums if there are any wobbling tones on your drums.

Studio Recording

When recording in a studio, make sure you spend extra care to get the right tuning for the music you are recording before you actually go there. Again, you can fine tune when you are set up in the studio, but you don’t want to be spending studio time doing this for too long if you are on a budget as it’s probably going to be costing a lot of money. If your band mates see you wasting time tuning, they’ll probably get annoyed if they are splitting the cost with you.

Some players fine tune for each song, or tune to specific musical notes on the toms when recording.

Snare Drum Subdivisions Exercise – 8ths, Triplets & 16th Notes

8th note Subdivisions

You need to play 2 snare drums per beat. Put a metronome on a slow tempo (60-80) and try to play the right hand on every click.

Then with your left hand, try to add a beat in between the right hands. When you do that you will be playing 2 snares for every 1 metronome click.

Count 1 + 2 + 3 + 4 + when you play this. The left hand falls on all the + counts, and the right hand will be with all the numbers.

Triplet Subdivisions

These are trickier. Think of them as groups of 3.

  • The 1st group is R L R (right left right).
  • The 2nd group is L R L (left right left).
  • The 3rd group is R L R (right left right).
  • The 4th group is L R L (left right left).

You should count “1 trip let 2 trip let 3 trip let 4 trip let”

If played with metronome, the click would land on all the numbers.

So it’s not just the right hand that lands on the click this time, it swaps onto the left hand for the 2nd and 4th group. That’s what makes it hard!

16th note Subdivisions

These are actually easier than triplets. You will need to play these twice as fast as 8th notes.

The counting for these is:

” 1 E + a 2 E + a 3 E + a 4 E + a “

I’ve written capital E and small a for a reason here. The E is pronounced as a capital E. and the ‘a’ is said like ‘a’ rather than ‘A’.

The sticking is R L R L all the way through.

With a metronome click, again the click lands on the numbers, and everything else should be played in between. So you get 4 notes (R L R L) per click.

Subdivision Exercise

You need to master the subdivisions seperately first before trying the exercise.

In a song you are likely to be changing between subdivisions frequently, as you move between fills and beats and sections in the music. This exercise prepares you for these changes.

In the exercise you will play 2 bars of a subdivision, before moving straight to the next without stopping. Take practice time to work on keeping the pulse the same when you change from one to the next. Make sure to practice with a metronome after you get comfortable with the changes.

The subdivision exercises are featured in Rockschool exams all the way up to grade 8, as part of the technical exercises. More subdivisions are added further on, but the core principles of changing from one to another remains. So spend time mastering this, it’s a valuable skill to have as a drummer.

Learning How To Read and Play Subdivisions

Put the metronome on at 60pm and try to play this sheet. Line 1 will be 1 note per click. Line 2 will be 2 hits per click (stricking R L R L). Line 3 will be 4 notes per click (again, R L R L sticking). Line 4 and 5 are duplicates of line 1 and 2, so follow the instructions for those.

Try the exercise at faster speeds when you have mastered 60bpm.

Subdivision exercise with linear drum fills

At grade 5-6 you should have good knowledge of triplets, 16th notes and sextuplets, and you will need to be able to switch seamlessly between them. This exercise works on changing between
triplets, 16th notes, and sextuplets like usual subdivision exercises, but with the twist of adding some interesting and challenging drum fills rather than just one one drum (usually just played as snare drum exercises).

(Premium) – 10 Pages of Accent Exercises with 16th notes – PDF ebook

Buy Now →

10 pages of 16th note accent exercises, which includes accents and doubles around the kit. This ebook is designed to help progress technique and explore creative concepts by moving sticking exercises around the kit in various different ways.

Most exercises in the ebook are suitable for all ability levels, played at varying speeds.

This ebook covers a lot of ability levels in just 10 pages. There is content from Grade 1 up to Grade 8 in there. You’ll be able to dip in and out of this ebook when you want to work on accents, fills and double strokes.


Recommended Reading for use with this ebook:
Accent Techniques – Down, Tap, Up, Full Strokes →
16th Note Hi Hat Grooves With Accents →
Reading Buzz Rolls And Double Stroke Markings →

10 Beginners drum fills lasting 1 bar

Play Right hand on all crotchets (1/4 notes), and Right Left on all of the Quavers (8th Notes) – (opposite for left handers).

Young beginners players could count the crotchets as Tea, and the quavers as “Cof-fee”.

You might want to brush up the Reading Drum Notation sheet to help with reading this sheet.


Related (Premium): Beats and Fills Drum Book – Basic Beginners