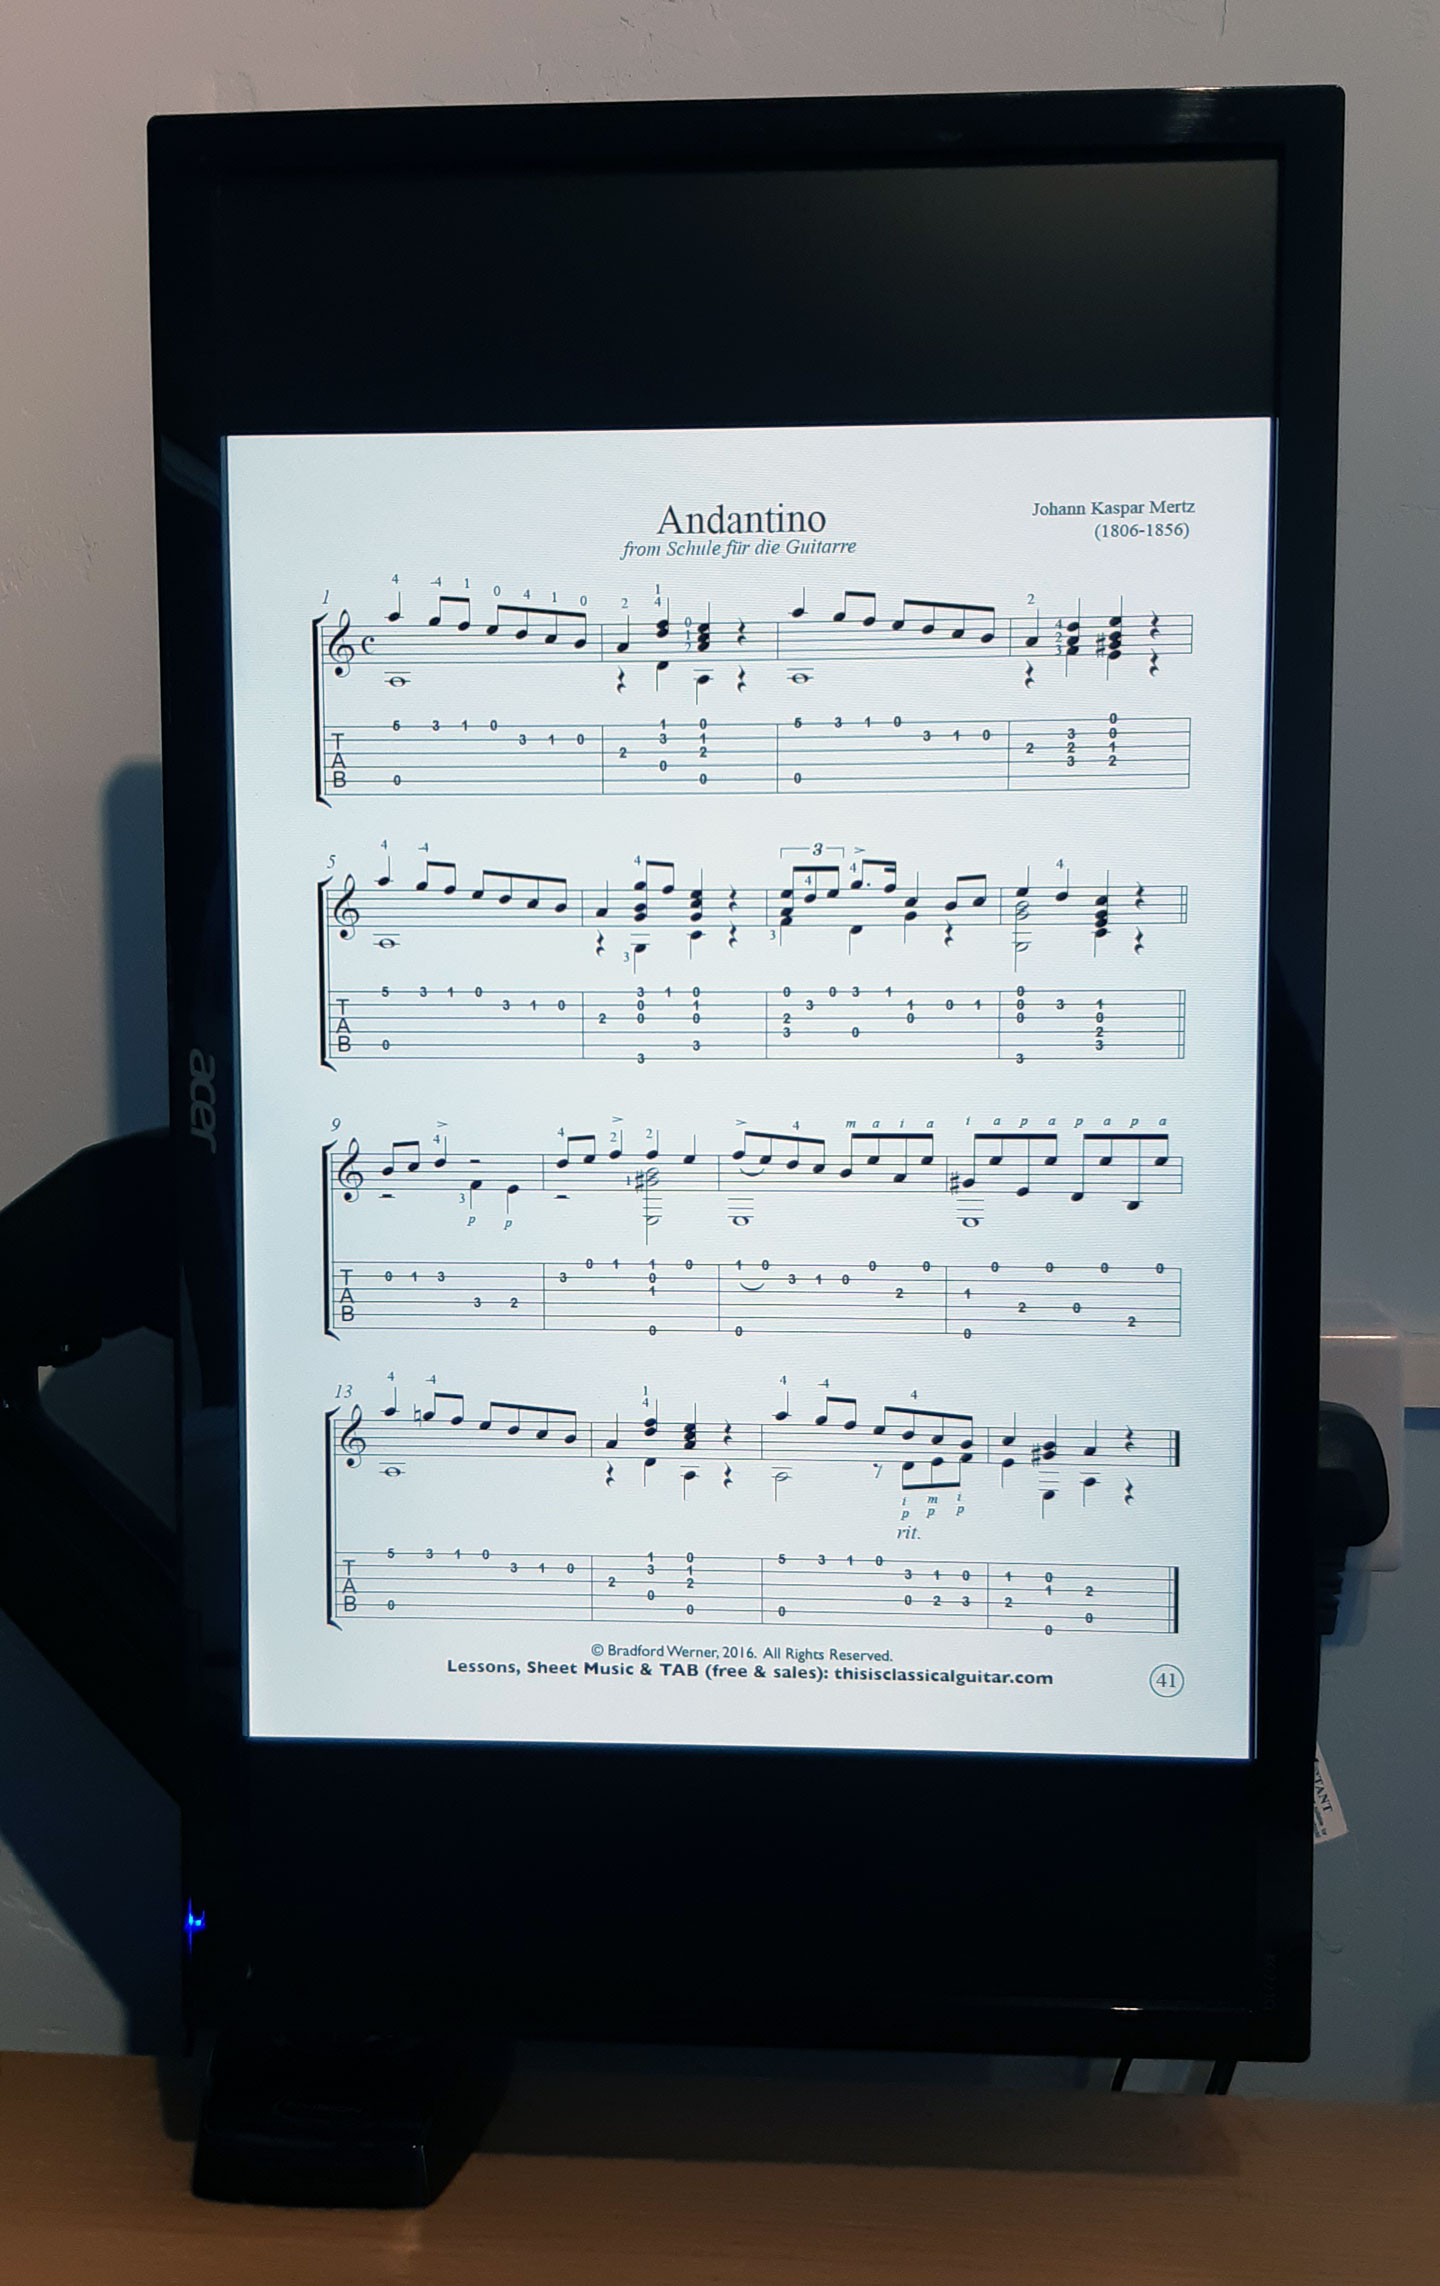
Today I installed a Full Motion PC Monitor Arm to my desk so that I can rotate my PC screen to read sheet music easily.
As I have been doing more teaching from home, and also have had more time to practice my instruments, I have been getting increasingly frustrated when reading music, because in Landscape mode it involves a lot of scrolling. You have to scroll much more frequenly than if the screen was in portrait mode.
I asked my techy gamer friend which one she has in her setup that I have seen, and she said to get this one, so I did.
Moving the monitor and benefits
I can now move the screen into portrait and load up a guitar book pdf and play away. You can go into full screen mode (Ctrl+L) and then press the down arrow key to move to the next page. Or you can use one of the other viewing methods without full screen mode and that way you can see a bit of the next sheet, and then press the down arrow to scroll or PgDn button to jump lower, or use the mouse.
To move the monitor, you can grab the screen and twist it around to make it portrait or landscape, or anything in between. You can also tilt it forwards and backwards and also move it left to right so that it can face someone to your left or right. This I think will come in very handy, because when I have been doing skype lessons on drums, I have been dragging my monitor around to face the drums, so this will be much easier, as you ust move it and then it stays in that position, so no screwing etc to move it.
How to change from Portrait to Landscape
To change the screen orientation to portrait in windows 10, you can right click on the desktop and click ‘Display Settings’ and change it there. My graphics card doesn’t allow the hotkey to change it annoyingly, but most people can change the screen orientation by clicking Ctrl+Alt+arrow keys.
Other Uses
The arm will help in lots of other ways too, like moving the screen so I can see it from the floor for workouts. I have been using the office to do home workouts from centr.com (unleashed and the da rulk masterclass have been enjoyable) and some others like Shona Virtue’s Fitness Programme after purchasing a cheap 8kg kettle bell from Aldi (was a rare find as weights were scarce).
I’m sure it will come in handy for positioning the monitor for gaming too, with a particular interest in F1 games.
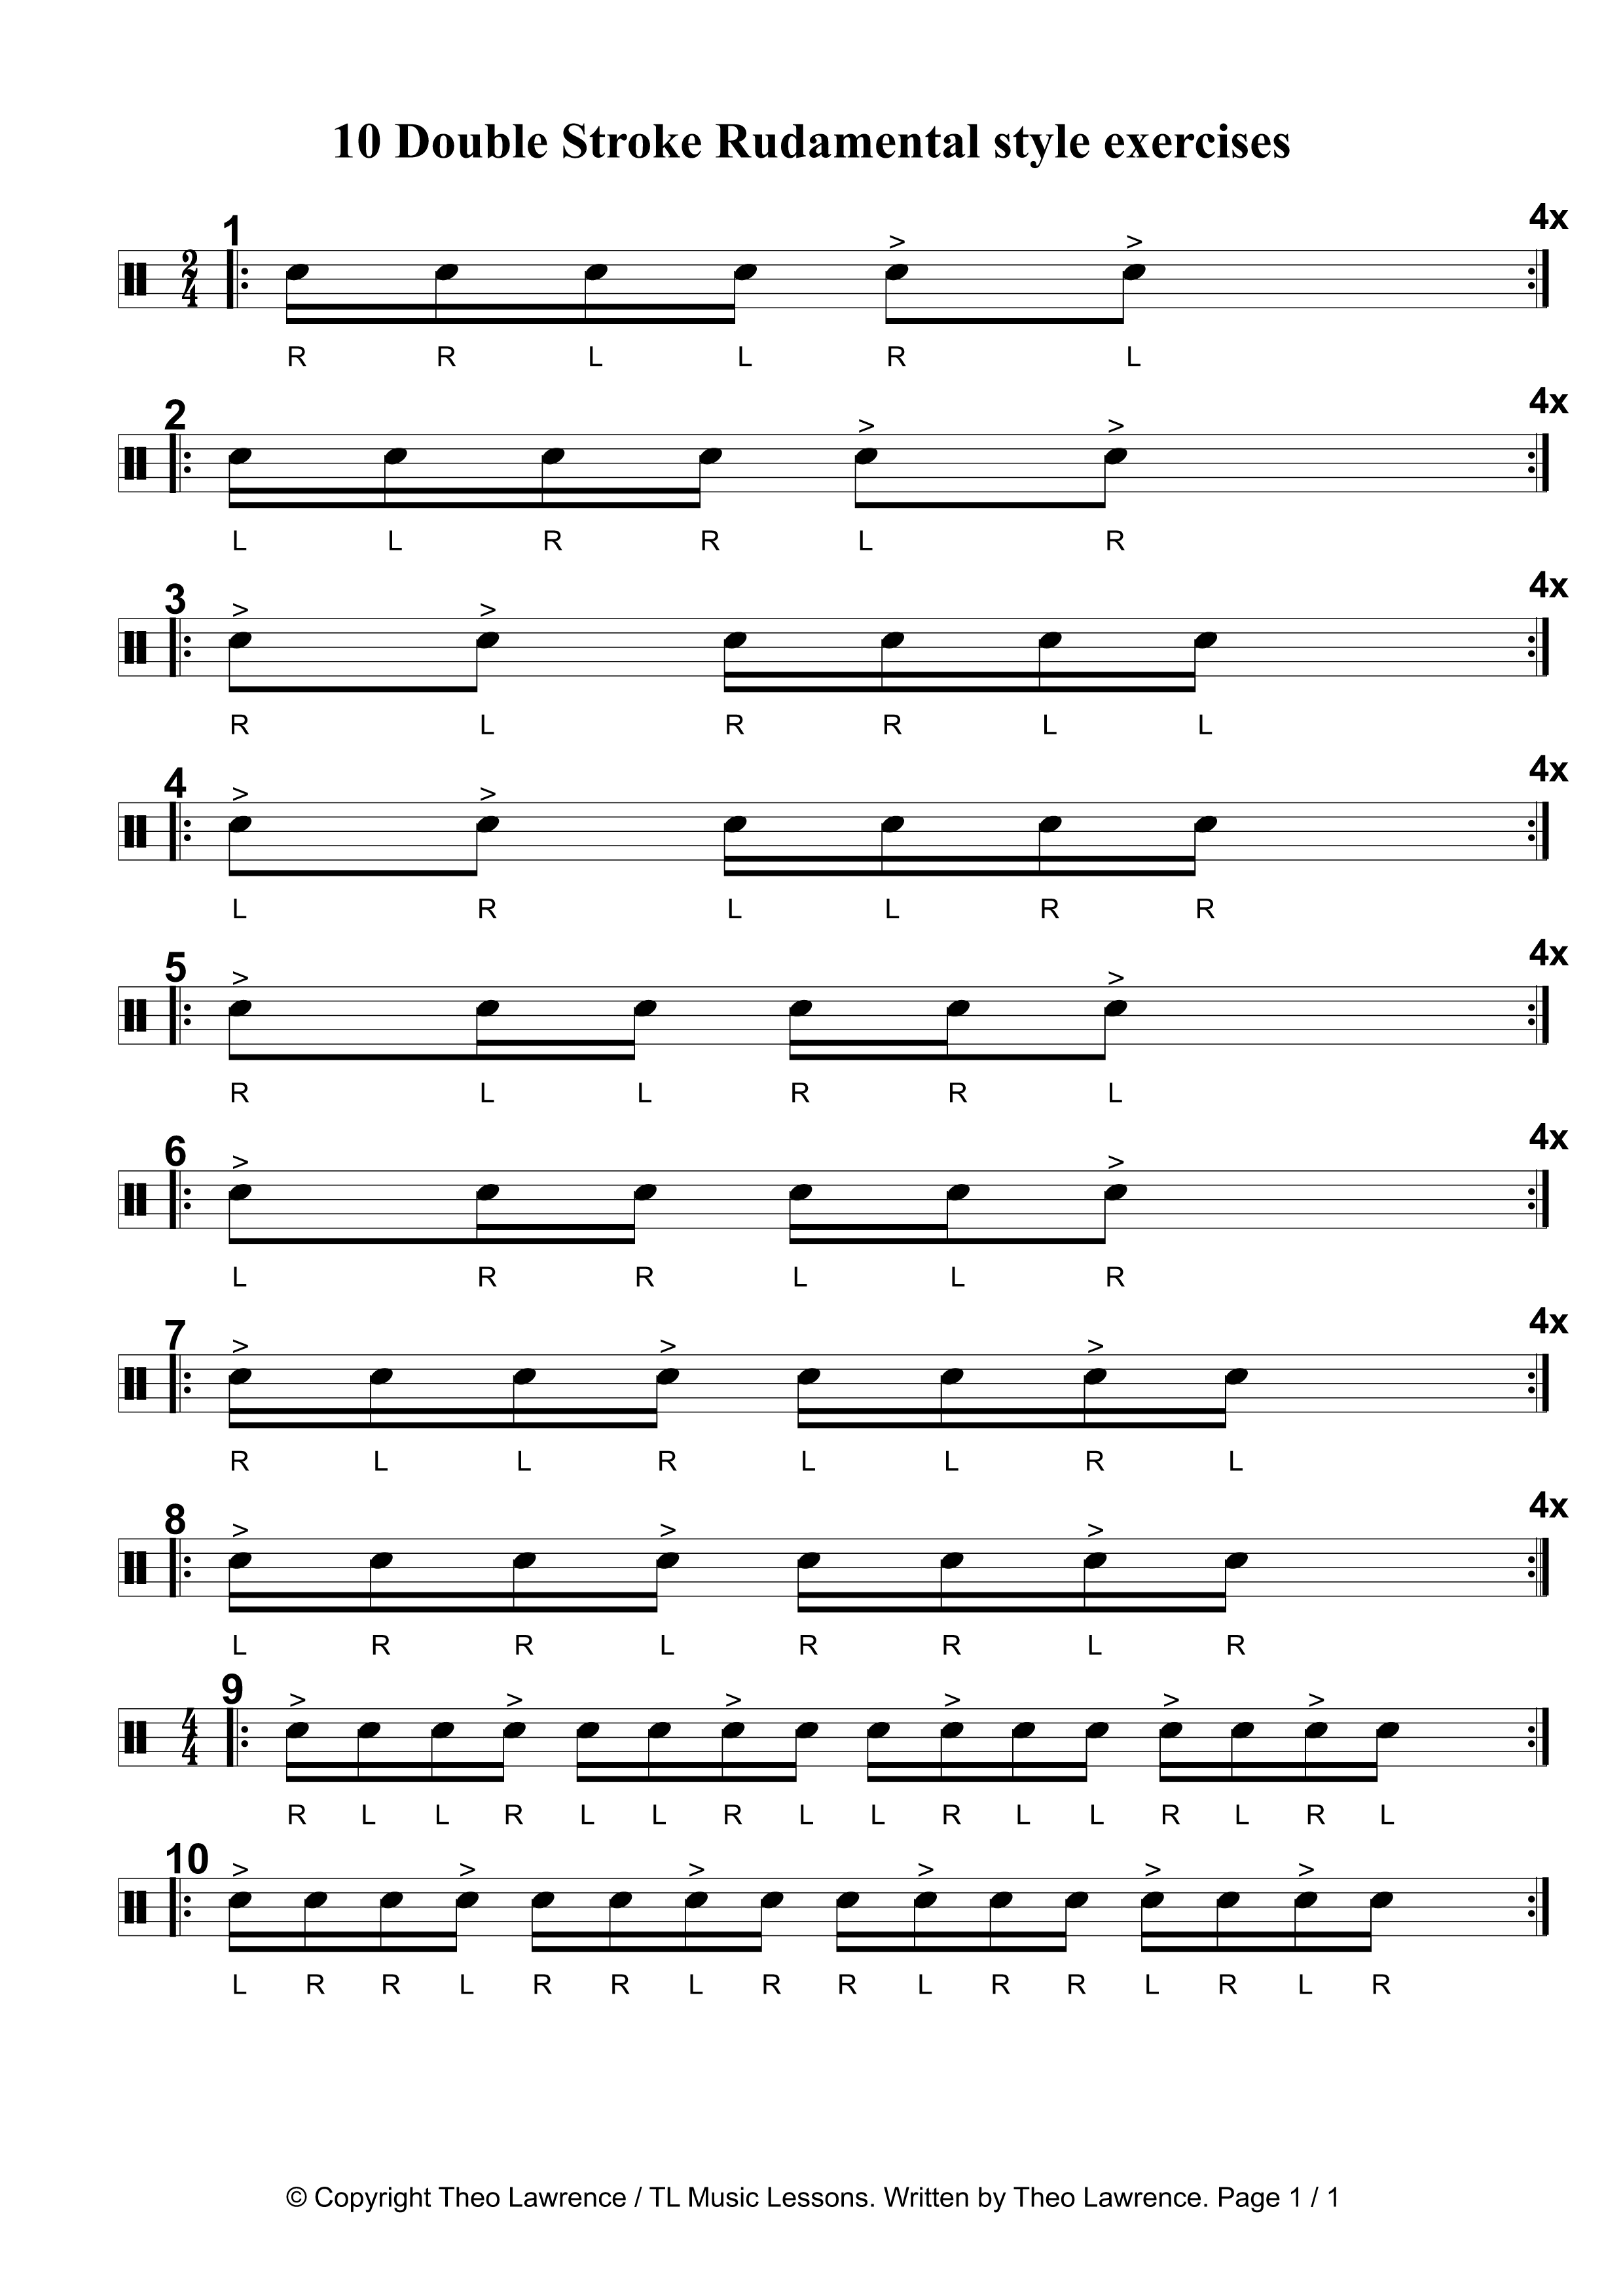
There are quite a few double stroke rudiment exercises in the 40 official drum rudiments, but none of these are in them. While the ’40 drum rudiments’ cover many of a drummers needs, in terms of practicing, there are many more double stroke exercises that are useful to learn.
The 10 rudiment – style snare drum exercises here are all involving double strokes. These snare drum exercises are all rhythms that I use quite often in my drumming, so to me they are quite essential I believe.
When learning rudiments, I was always taught that they are preparing you for possible eventualities in drumming – for example by learning and practicing the flam with different leading hands, you have prepared for using it in drum fills in songs, in a variety of situations. So to me, all of these 10 rudiment exercises are essential patterns that you will need at some point as a drummer, so to master these, will be beneficial to you for when you meet the patterns elsewhere.
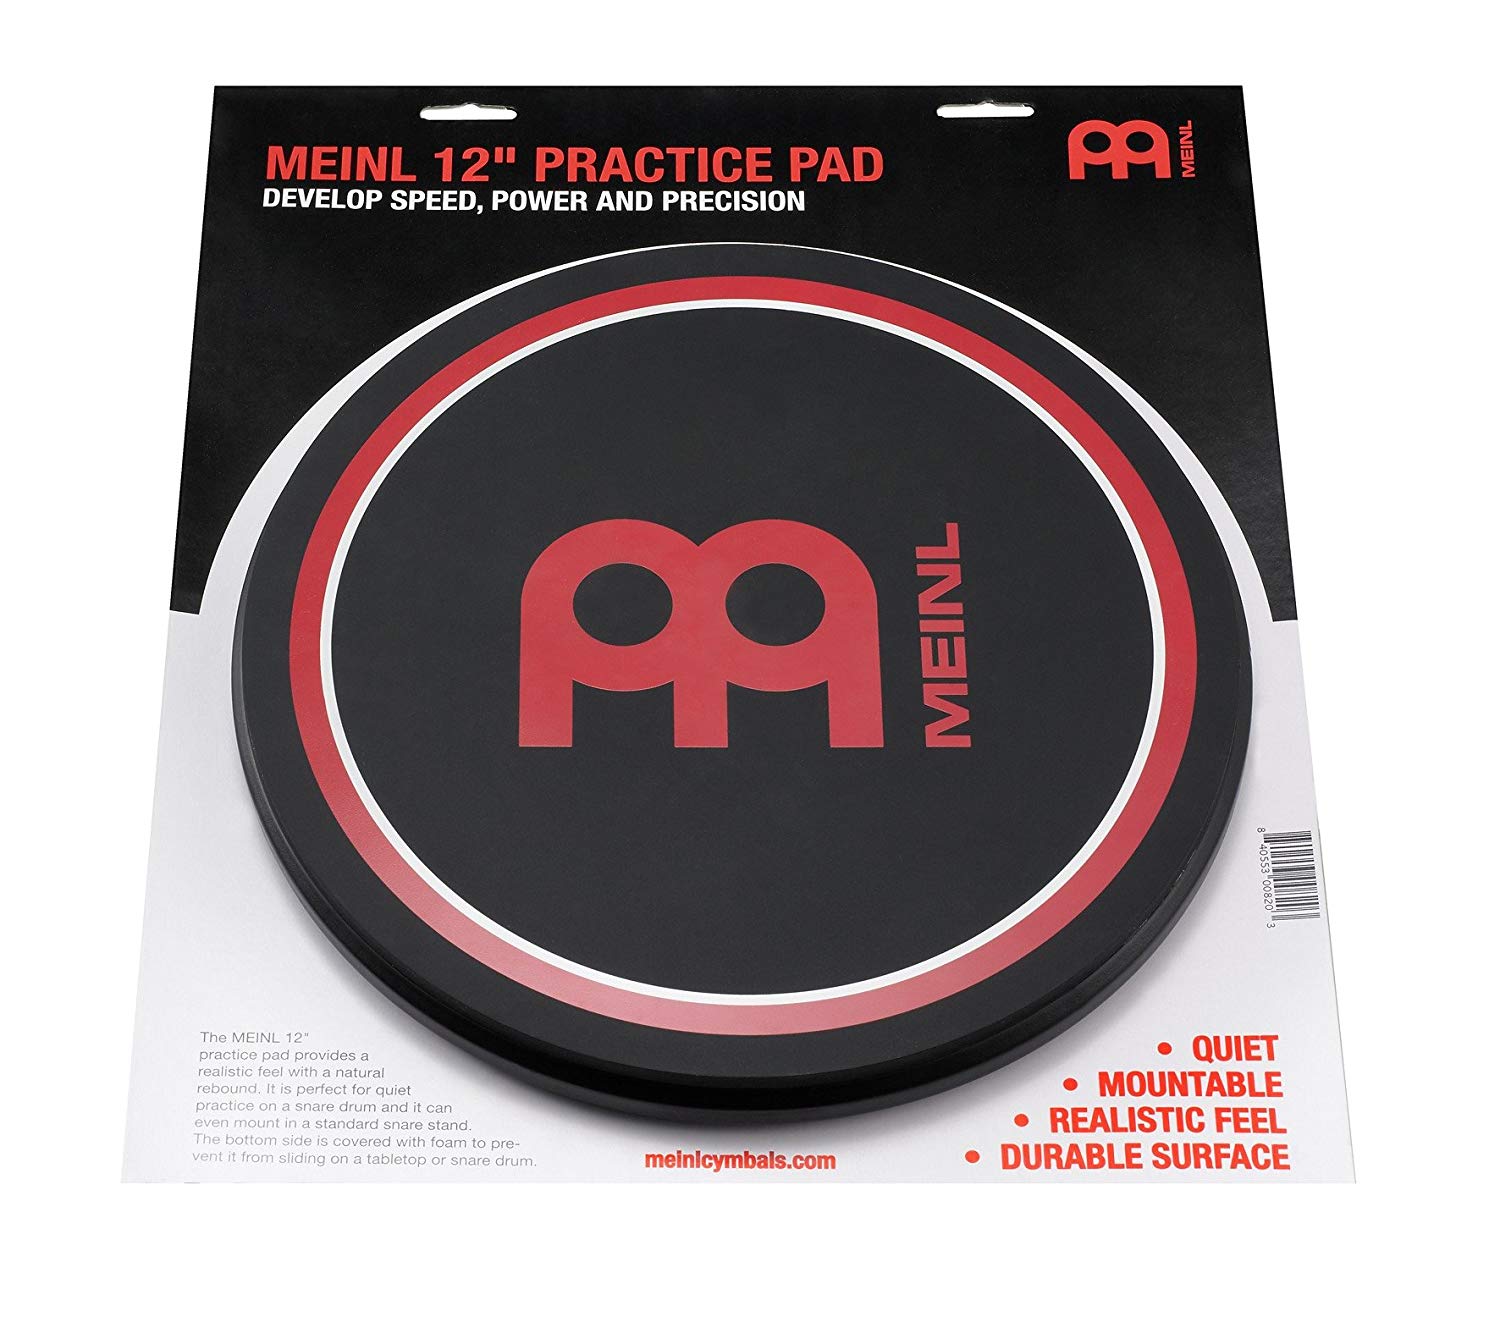
The Meinl MPP-12 practice pad is quiet but loud enough that it’s satisfying to play. The rubber surface has some give to it so it’s not like hitting hard plastic. The bounce is realistic and similar to a tightly tuned snare.
I bought this pad to use with a youth snare drum group I tutor in the UK. It’s sort of a Snare Line, but I’m just a normal drummer adapting bits from what I’ve seen drumlines do for my group, and creating something different. We spend a large part of the weekly session on warm ups and exercises using the practice pads before then moving onto the snare drums to play pieces nearer the end of the session. I fell in love with this Meinl practice pad instantly when it came just by how nice it looks, and how it’s made. I was worried the playing surface might be too hard, but it’s not. When I started playing it, I knew this pad was a great choice.
The drum pad can sit on a table or on top of a snare drum just fine without moving around and with the volume staying about the same. It can also be attached to a snare drum stand. Meinl do sell a 6″ one that has a screw hole for attaching to a cymbal stand. I prefer the 12″ one because it can sit on a table or a snare drum and feels more sturdy than on a cymbal stand, which can wobble around. The 6″ pad is also less solid on a table or snare drum and is likely to move around a lot. I have attached a 6″ pad to a snare drum stand before an I can report it’s not good because the 3 parts where the stand grips the pad can get in the way of your sticks and you really have to crank up the screw thing underneath to get it to fit (annoying if you are switching between pad and snare often).
You can also get signature models such as the Thomas Lang practice pad seen in the video below. The video mentions it not being for practicing marching snares but I personally disagree because for the marching snare pads I’ve seen, such as the Ahead 14″ S-Hoop Marching Pad, I don’t think it’s good for people’s hands and arms to be hitting carbon fibre. My drum teachers in college always said it was dangerous to have practice pads that are hard because it can cause tendonitis. So I would say, these Meinl pads would be good for marching practice and general snare drum practice, but check with your drumline / drumming group before buying, because they might prefer something else. The sound of the 12″ pad has a nice crisp sound, not dissimilar to a marching snare.
There are six parts of a drumstick. The tip strikes the drum. The neck is the thinnest point. The taper is where a stick thickens and widens. The shoulder is the thickest end of the taper. The shaft is the main body of the stick. The butt is the part you hold.
When you first start playing the drums, it’s easy to assume that picking up a pair of drumsticks is the simplest part of learning to play the drum kit.
After all, aren’t different drumsticks pretty similar? And why do I have to learn about the parts of a stick? Isn’t it the drums that will really determine how you’ll sound?
Surprisingly, the pieces of wood that come between you and your drums can have a huge impact on your tone, feel and ability to play the music you love.
Drumstick anatomy can seem complex, but fortunately, there’s really not too much to learn.
This article will take you through everything you need to know, so you can sound like a seasoned expert wherever you go.
A great place to start is a quick overview of the entire drumstick.
Neil Larivee from the iconic drumstick company Vic Firth takes us through the various parts of a drumstick in the helpful video below.
He doesn’t mention the butt of the stick, but it’s such a common term that I decided to include it in this article.
Learning more about how a drumstick is designed is essential for finding the pair of sticks that suits you best.
If you’re a rock drummer, you’re going to need a pair of rock drumsticks that can compete with the volume and intensity of a loud band.
Yet, if you’re a jazz drummer, you’re going to need a pair of jazz sticks that give you a crisp, light touch on the drums.
Understanding the parts of a drumstick, and how they differ from stick to stick, is key to getting the right tools for the job.
First and foremost, it will allow you to make a more informed choice every time you visit the music shop.
You’ll be able to compare different brands, makes and models and understand more of the key differences between them.
What’s more, you’ll be able to speak a common language with other knowledgeable drummers, and this allows you to benefit from their experience.
So without further ado, let’s get into the nitty gritty of what makes each drumstick unique!
The Tip
wooden vs nylon drum stick tips
The first and arguably the most important part of a drumstick is the tip.
The tip of a drumstick is the area of the stick that is most commonly going to be coming into contact with the drum.
As a result, the shape and style of the tip has the most direct impact on your sound.
Different shaped tips bring out different sounds from your drums.
Some produce a darker, warmer tone, whereas others are more defined, with a sharper and brighter sound.
Why do different tips produce different sounds?
Here’s the clever science bit: It’s all to do with how much of the surface area of the tip comes into contact with the drum.
Some stick tips are shaped so that only a tiny amount of the stick tip will actually touch the drum.
This produces a lot of higher overtones, producing a brighter sound which is more defined and more easily heard in the mix of the music.
On the other hand, some stick tips have a much wider surface touching the drum, increasing the number of lower overtones in the mix.
This extra surface area often provides a fuller, more rounded tone; while not as defined as the brighter stick tips, many drummers prefer this extra warmth to their drum sound.
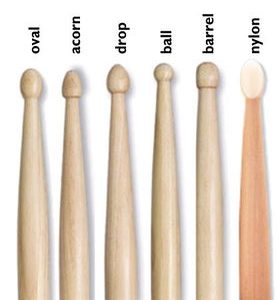
Different Drumstick Tips
Here’s a breakdown of all the different drumstick tip types you’ll need to know.
Drum companies are always designing new variations for drumstick tips, however, most typically fall into a number of popular categories:
types of drum stick tips
Ball: A ball shaped tip is a useful tip shape because it provides incredible consistency to your playing.
The tone you produce with this stick tip is likely to be very even and well-balanced.
Why? Because the amount of surface area that comes into contact with the drum you are playing is always the same.
This is because it has a perfect sphere shape (shown above), so whatever angle you hit the drum at, you’ll get the same amount of stick surface area coming into contact with the drum.
Pretty neat huh?
As a smaller stick tip, the ball shape provides a bright, light and crisp sound.
Oval: The oval tip is a really expressive stick shape, providing great variety in tone to the drummer who plays with them.
In contrast to tips like the ball shape, you have a lot of freedom with the sound you choose to generate every time you sit down to play.
You can play your drums at different angles to change up your tone pretty easily with this stick.
If you’re not sure what tone you like, try an oval stick.
You’ll have access to a wider range of overtones with this stick.
It’s a great stick shape to experiment with and unleash your creativity.
Acorn: Acorn tips typically have a large surface area that comes into contact with the drum.
This produces a fuller, fatter sound with a nice rounded mix of tones.
Simply put, the acorn tip is a heavy lifter in the world of drumstick tips, and it’s well worth having a pair of acorn tips in your stick bag.
The acorn tip is versatile enough to suit most musical styles and genres, and as a result is widely used by the top drumstick companies.
Drop/Teardrop: You’ll find this shape on the most popular drumsticks ever created (the Vic Firth’s American Classic 5As), and it’s easy to understand why.
Like the acorn tip, it has a large surface area coming into contact with the drum, providing a warm, full and highly desirable tone.
Like the acorn, you can use the teardrop in many musical situations, making it another top all-round choice.
A useful thing to know is that if you like the tone of a particular drum tip, you can customise that stick to the kind of music you play by changing the size of the stick.
So if you’re a fan of the teardrop shape but need a stick with a big more oomph for loud musical settings, you could choose a 5B stick over a 5A stick.
Barrel: The barrel tip is small and fat.
It provides a punchy sound favoured by some of the world’s top drummers.
Take a look at legendary drummer Steve Gadd rocking out with a pair of barrel tip drumsticks in this epic drum solo.
The barrel tip is great for producing a high-quality recording sound in the studio, and therefore is favoured by a great session drummer like Steve.
Nylon: While you’ll find wood tips on almost all drumsticks, there are alternatives that drummers sometimes prefer.
Whereas we’ve been focusing mostly on the shape of drumstick tips so far, choosing a different material for the stick tip has a significant impact on the overall sound.
Nylon tips produce a brighter sound than wood sticks on average for stick tips of the same size.
In particular, they are able to generate a sharp ‘ping’ sound from playing the cymbals.
This can help drummers be heard more clearly, particularly when playing in noisy environments.
Nylon tips also tend to break less easily and don’t wear down like wood tips do.
Editor’s Note: If you play heavier music such as rock or metal, you may find the tone of the snare drum and tom hits less pleasing, and even worse, the tips can fly off. You could try using some strong glue if this happens, but in my experience, wooden oval tips are the way to go for heavier styles just because the overall sound suits the styles better.
Can I hear an example of the differences between the tips?
You certainly can! Have a watch of this great video that provides real examples of different stick tips in action.
The neck is the thinnest point of the entire drumstick. You’ll find this point just behind the tip of the stick, before the stick thickens and widens.
Thicker stick necks are more durable and likely to make your stick last longer, but this can make the stick feel clunky and unresponsive.
There was a time when drumstick necks would break regularly and the drumstick tips would just fly off, but the reliability of drumsticks has improved greatly over the years.
Most of the time, you don’t need to worry about this one point on the drumstick.
If you’re breaking your sticks a lot, you’ll probably want to choose a larger, thicker drum stick.
The Taper
The taper is where the stick thickens and widens, from the neck all the way up to the shoulder of the stick.
The design of this part of the stick has a big impact on the playability of the stick, giving a stick part of its unique feel when you strike the drum.
All drumsticks have a different “feel” to them.
Sticks that are thinner and longer are often described as highly responsive sticks.
Heavier and shorter sticks provide more power, but are stiffer and harder in the hands.
A shorter taper will favour a drummer who prefers to have more power and a longer taper will favour a drummer who prefers responsiveness.
There’s no right answer when it comes to choosing a style of taper that you like.
It’s likely that you’ll develop a personal preference depending on the music you play and your own playing technique on the drums.
The Shoulder
The shoulder of the stick can be found at the end of the taper, where the taper has reached its thickest point.
The location of the shoulder is determined by how long the taper is.
So the longer a taper is, the further away from the tip the shoulder is.
The shorter the taper is, the closer the shoulder is to the tip.
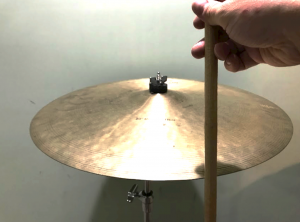
This part of the stick is mostly used for a single drum technique, which is to “crash” a cymbal.
Rather than playing on the top of a cymbal with the tip, we can get a much warmer and washier sound by striking the side of the cymbal with the shoulder of the stick.
In the video below, you’ll hear the difference that playing a cymbal with the shoulder of the stick produces.
The first time the drummer plays the cymbal, he uses the shoulder.
Tip: When “crashing the cymbal with the shoulder of the stick, make sure to avoid hitting the edge of the cymbal at too sharp an angle.
The stick should never be at 90 degrees like this. Your drumstick (or cymbal!) is likely to break very quickly!
Here’s how your stick should look as you strike the cymbal with the shoulder.
Hitting the crash with the shoulder of the stick
The tip of the stick never touches the cymbal, only the shoulder.
The Shaft/Body
The shaft or body is the main thick section that provides most of the weight to the drumstick.
The thickness and weight of this area will have a big impact on how the stick feels to play.
Thicker sticks, such as 2Bs and 5Bs, will deliver a huge amount of power thanks to their increased weight, but can be difficult to move around the kit.
Lighter sticks, such as 7As, are great for more complex and intricate drumming, but deliver less power.
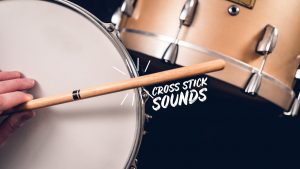
There are two occasions in which the shaft of the stick comes into contact with the drum.
The first is when using the crosstick technique (shown below) which creates a rim-clicking sound, popular in jazz, ballads and music that requires less volume.
cross stick snare drum hit
In the crosstick technique, the stick is turned around the opposite way to play.
The tip of the stick sits in the centre of the drum; the drummer then controls the stick with a light grip to knock the body/shaft against the rim.
Editor’s Note: You don’t have to switch the stick around, it just sounds cool if you do. If you are playing a piece that requires switching from normal snare to cross stick snare, don’t worry about swapping in the stick around to play the cross stick.
The other time that you would play with the body of the stick would be when playing a rimshot.
snare drum rimshot
When playing a rimshot, you strike the centre of the drum and the rim of the drum simultaneously.
This creates a much more powerful and defined sound, ideal for rock, metal and any genre that requires a punchier style of drumming.
The Butt
The final area of the stick is the butt end, where we will be holding the stick most of the time.
There’s no defined point at which the body of the stick becomes the butt, but we just think of the butt as the end of the stick that is the thickest.
Sometimes, drum companies will put a coloured grip or texture on the butt end to help drummers keep hold of the sticks during intense practice sessions and performances.
On occasion, drummers will turn their sticks around to play with the butt end instead of the tip, to get a heavier, fuller sound.
Some drummers go even further, adding a rimshot to the mix as well as using the butt.
They use the shaft of the stick on the rim while using the butt end to play the centre of the drum.
This creates a truly earth-shaking sound; it delivers even more power for drummers that need to be heard in the noisiest musical situations.
In conclusion
I hope you’ve enjoyed this introductory guide to the different parts of a drumstick.
My advice would be to get yourself down to your local music shop, and experience how the various types of drumsticks feel in reality.
You’ll be able to put this information to practical use and find the ideal pair of sticks that suits your playing style and the music you play – taking your drumming to the next level.
Check out this new drumming blog for more helpful guides: if you’ve ever wanted to learn how to read drum notation, the ‘how to read drum music’ guide is a great place to start.
I play some heavy styles and I have found that it is the only 5A pair that doesn’t break. They are so reliable and they will go on and on if especially if you are playing with good technique and hitting the edge of cymbals with the thicker part of the stick (on the shoulder).
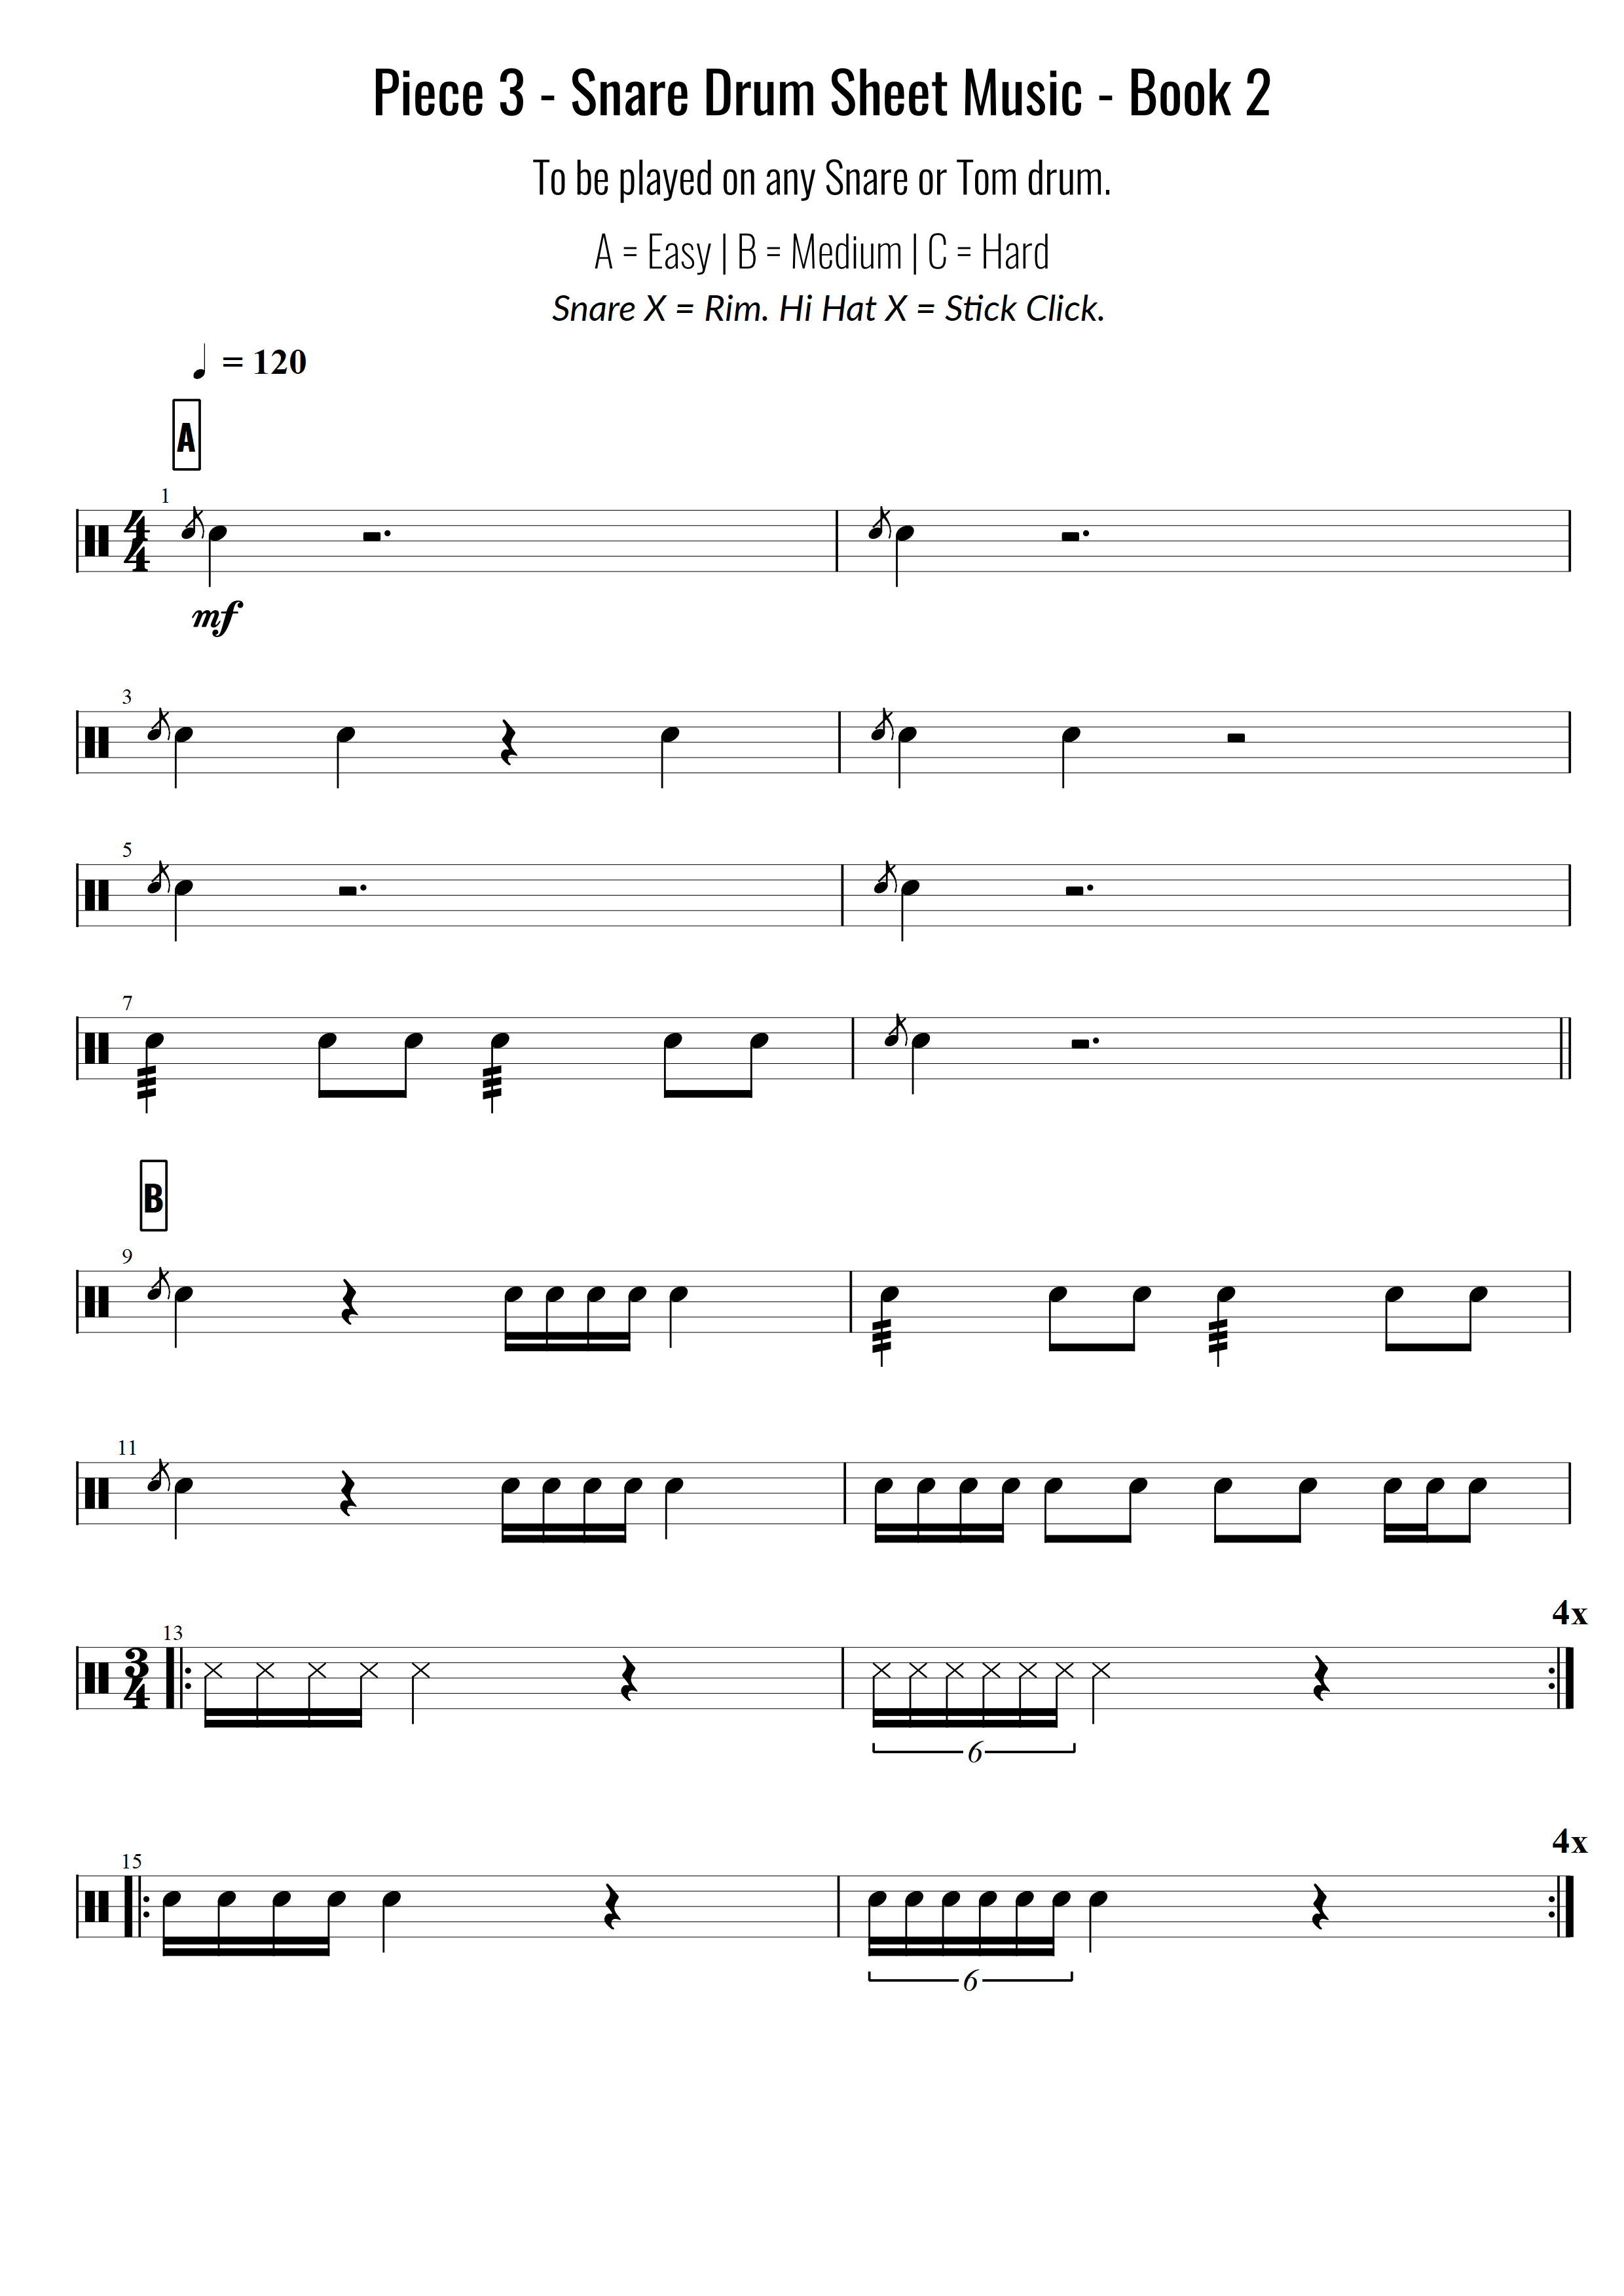
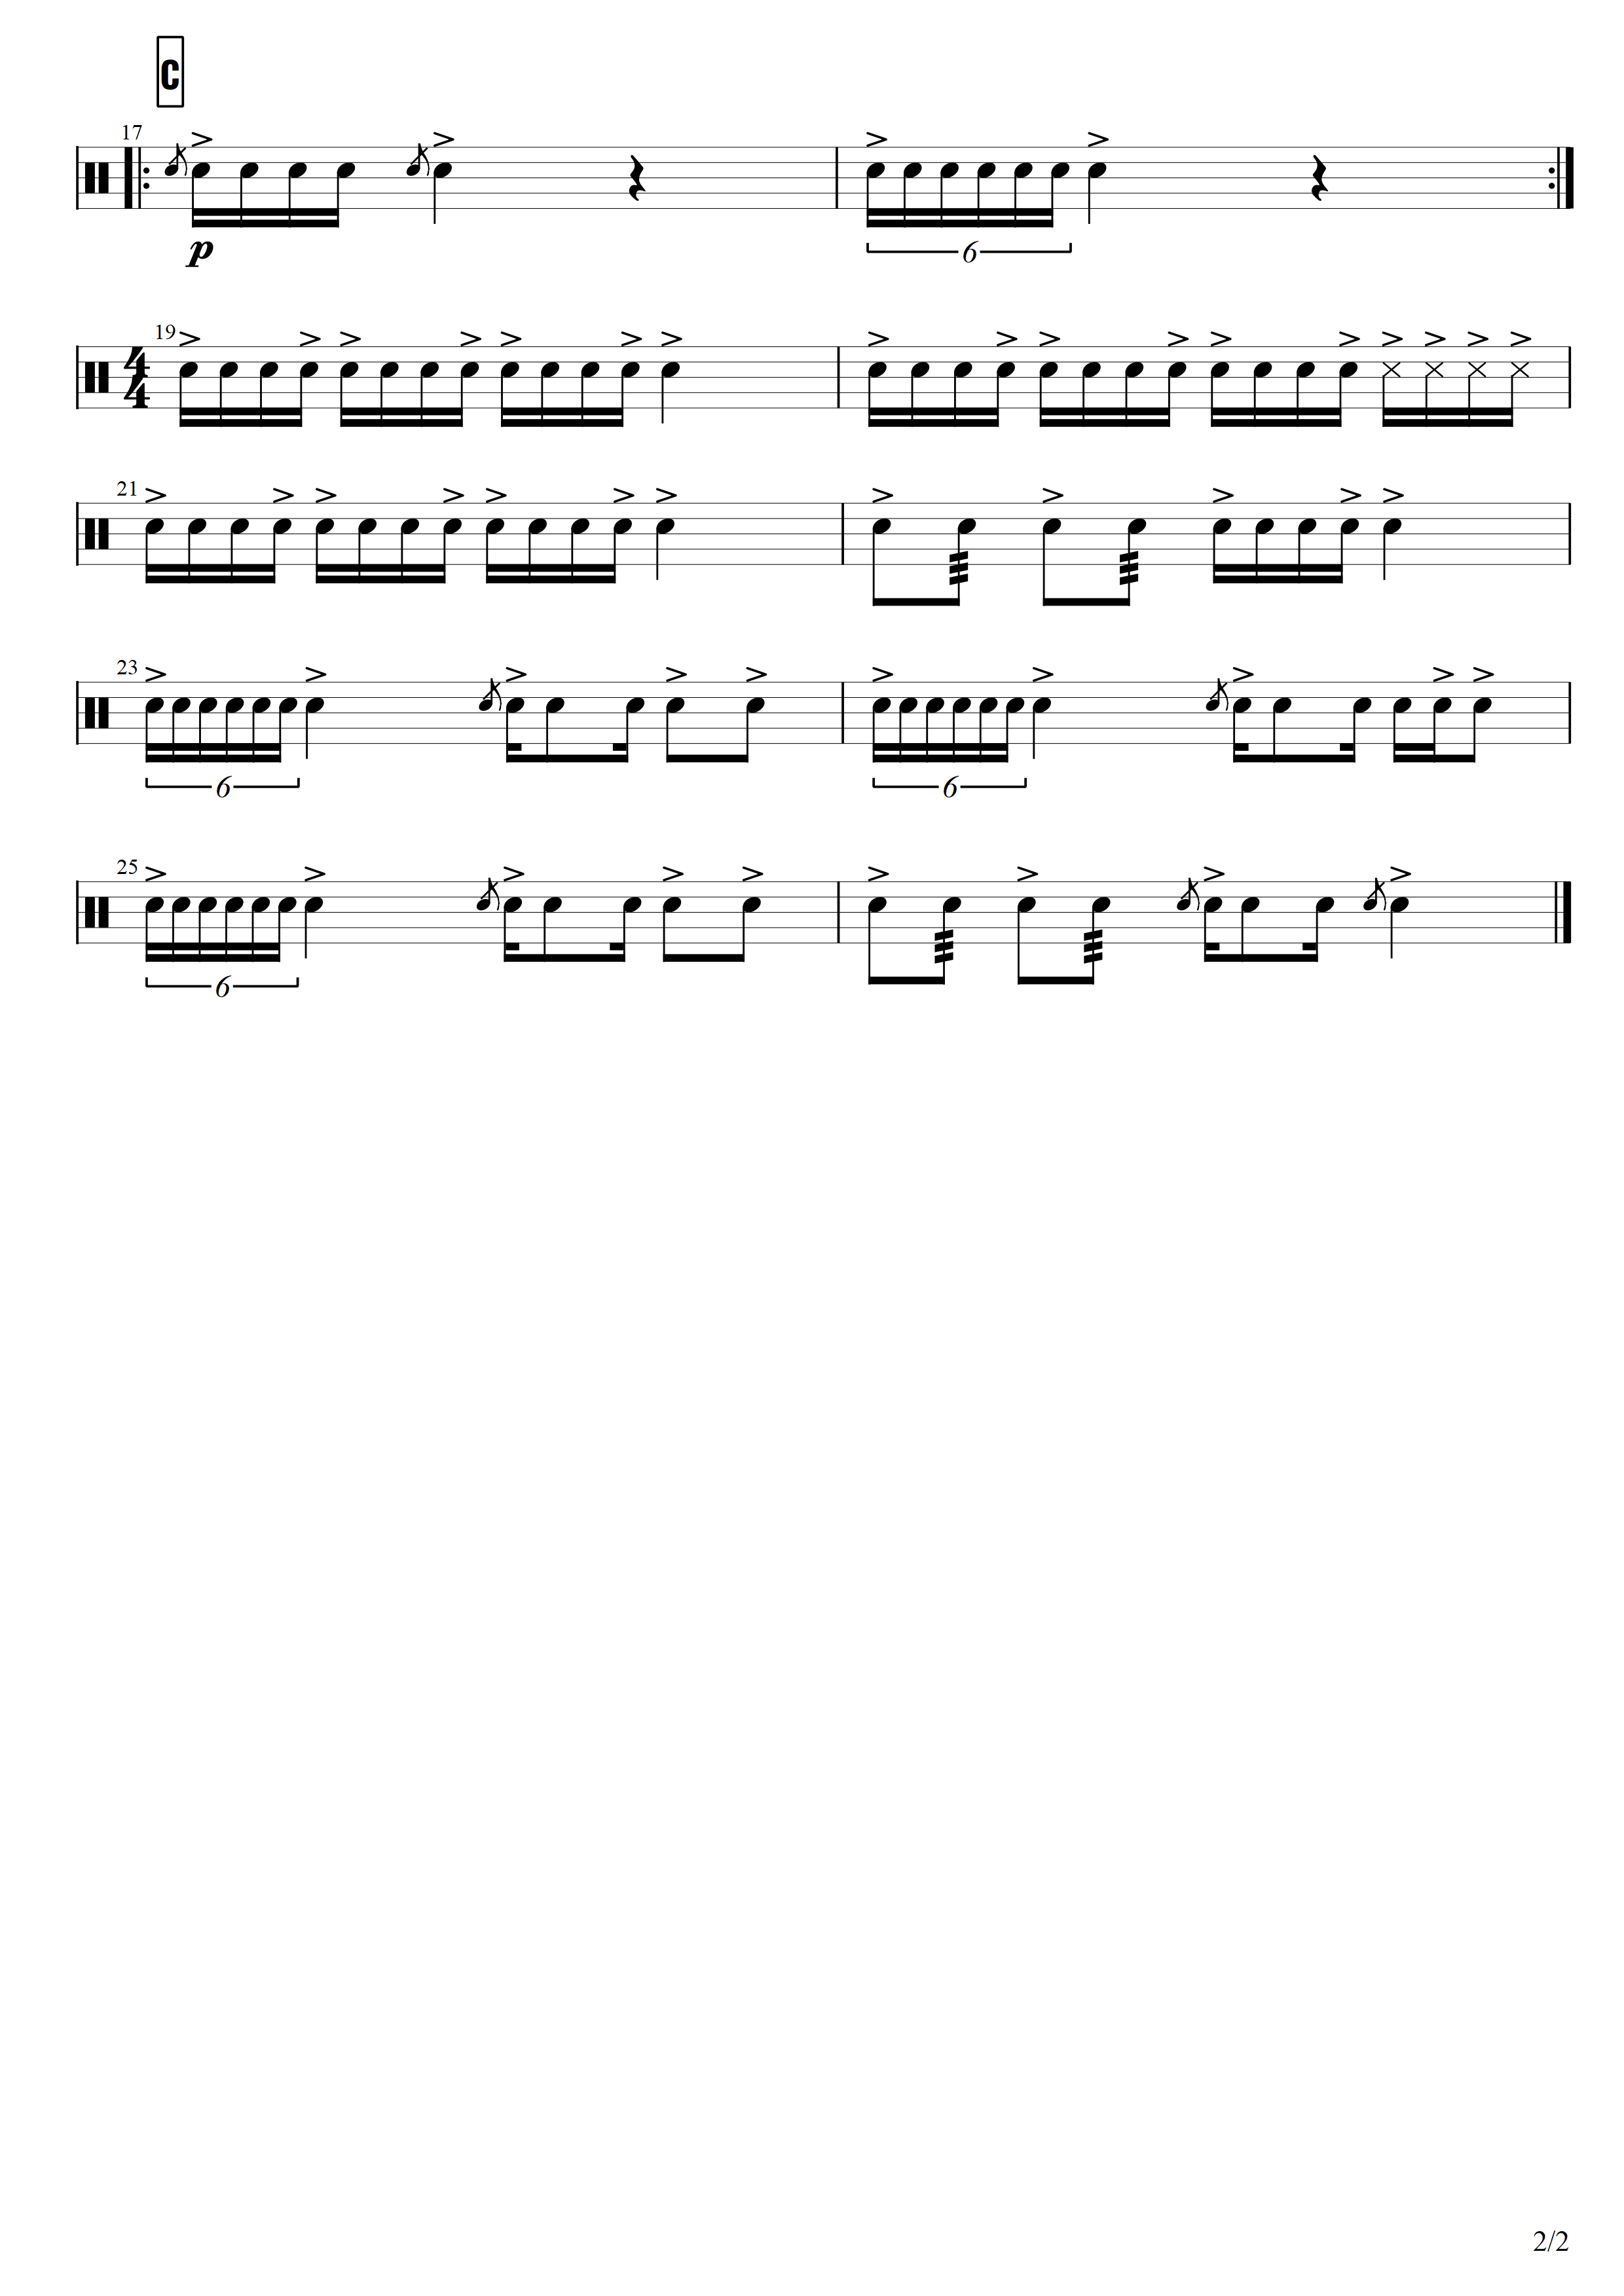
Coincidentally (not!), I wrote this snare drum warm up this morning for my drum group. We went through it today without reading it but soon it will be a reading exercise. It has most of the basics needed for levels spanning grade 1-5. Lots of different subdivisions in here to practice. You could break up the warm up and just work on one line, or 4 bars, or 1 section at a time.
For this 2 page snare drum piece there are 3 parts, A B and C. You can split up players into these groups of abilities (C is hardest). Some players could also play all three parts or just 2 parts.
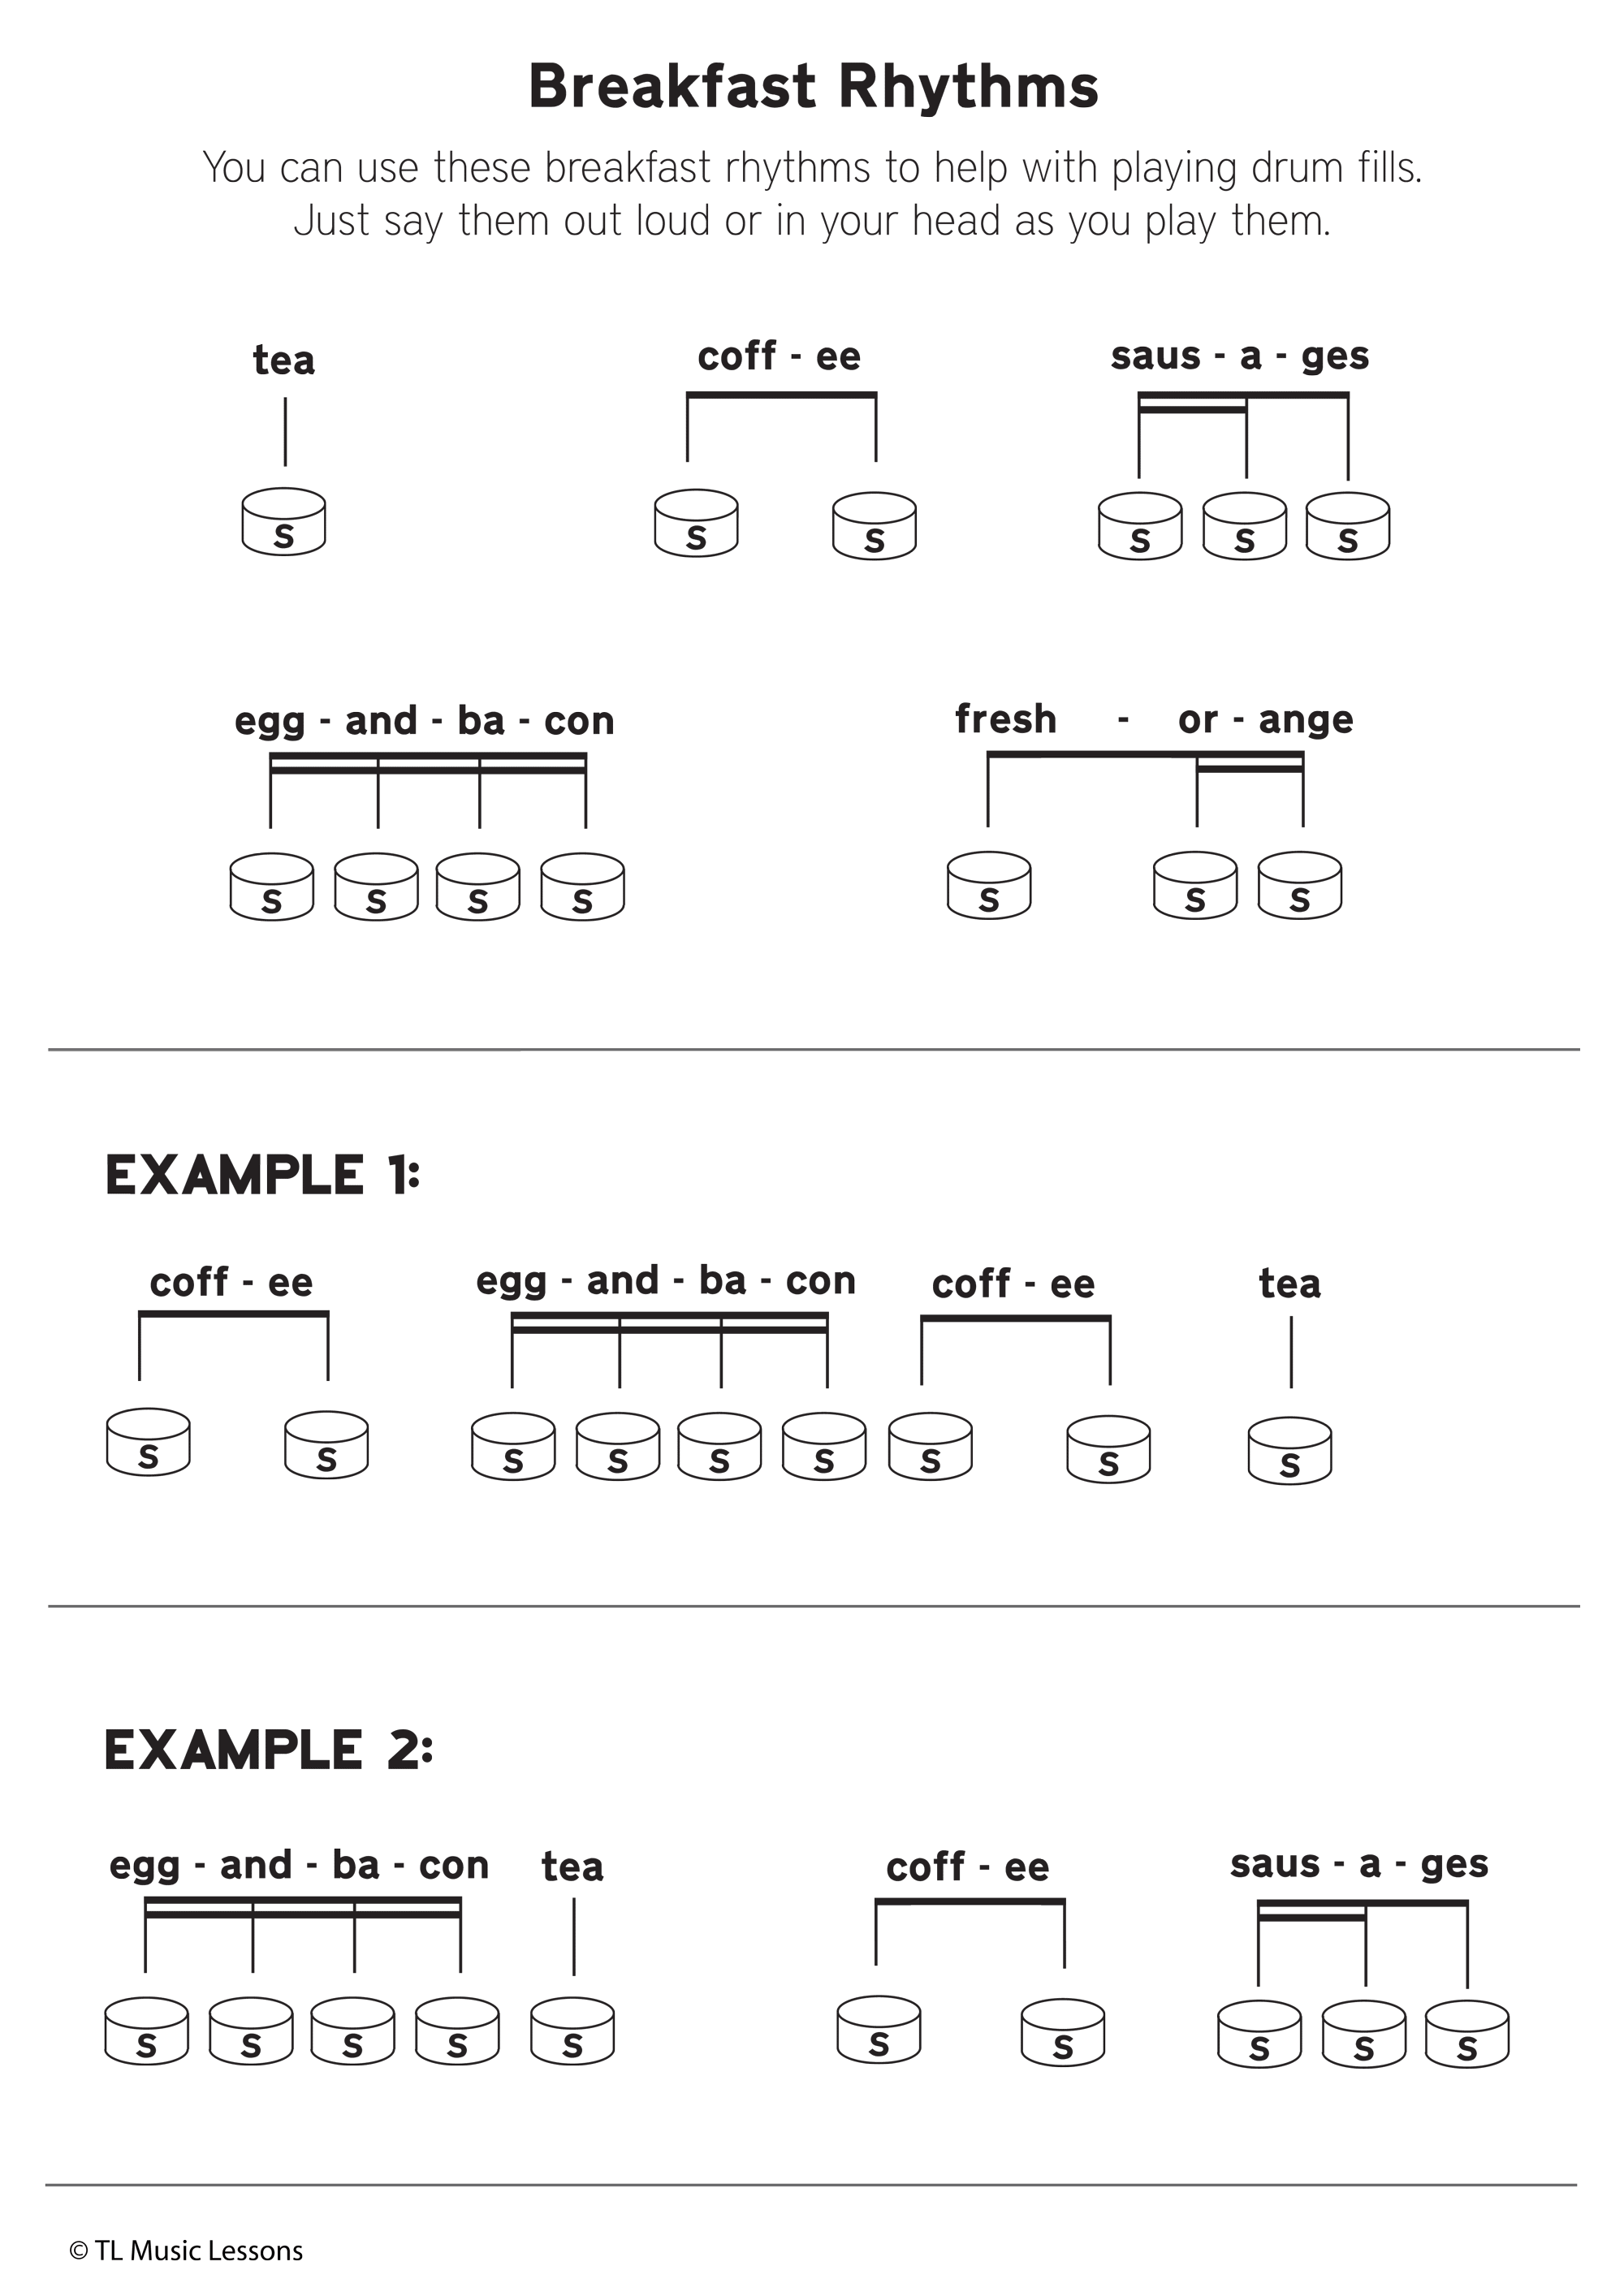
Breakfast rhythms are great for all primary school ages, and they can be fun for high school and adult ages too to help with the initial barrier of learning the rhythms. By saying the rhythm and seeing it at the same time, you will be associating the sound with how it looks on paper, so eventually you will know that two 16th notes and an 8th note sounds like the word “sausages”, so in the future you may not think of the word sausages but you will know how the rhythm goes instantly when you see them combined on the sheet music.
This sheet is an accompaniment for a book I have made called “First Drum Book – Easy Reading Beats & Fills” (it’s a premium download). This page is not in the book yet but I’m currently going through the book again to improve parts of it. If you download the book now, you’ll get a notification to download the latest version for free when it’s ready.
This sheet will also be very helpful for any of the free snare drum exercises or snare drum sheet music I have posted and also for any of the beats and fills exercises, for help with reading the drum fills.
I’ll never look at the paradiddle in the same way, after a student asked a sporadic question “who created the paradiddle?”. I replied quickly with “Jerry Paraddidle”. After some chuckles at the name and then the rest of the lesson passing, I had to admit at the end that it was a joke! I still don’t know who did, but I’m sure there is info out there.
But is the paradiddle boring?
Well yes and no. It’s how you look at it really. Practicing paradiddles can be boring if you focus on just repeating RLRRLRLL for 10 minutes with a metronome. However, when you look at it as a pattern to unlock a different path to the regular RLRLRLRL, then it’s more interesting because you can move the left and right hands onto different drum voices and make some interesting sounds.
The popularity of the paradiddle can also be limiting in the sense that it’s the go to rudiment. It’s important to keep an open mind with composing and to remember that you can make up your own patterns, in a similar way to the paradiddle, but different. Let’s take the idea of the paradiddle and make new rudiments, new patterns, new standards. Surely there’s other patterns we can be playing. OK let’s give it a go. RRLLLRLRRRL. Any good? Maybe it’s amazing played in an 11/8 time signature. I’ve not tried it, but do you get what I mean?
So anyway, let’s get onto the point of the post. This exercise sheet works with the popular paradiddle and shows how you can make practicing it interesting by moving the accents to toms and cymbals and making up different exercises with it.
The first 3 exercises are all seperate ideas, and then the 4th exercise combines all 3.
The paradiddle features in most of the Rockschool drum grades, so it’s not going away any time soon. You can work on these exercise at any level really, which is why I’ve specified a non specific ’60 to 120bpm’ as the speed. Basically, practice these with or without a metronome at what ever speed seems manageable and then try to increase it each time you go through it, or do it faster next time.
Contains information related to marketing campaigns of the user. These are shared with Google AdWords / Google Ads when the Google Ads and Google Analytics accounts are linked together.
90 days
__utma
ID used to identify users and sessions
2 years after last activity
__utmt
Used to monitor number of Google Analytics server requests
10 minutes
__utmb
Used to distinguish new sessions and visits. This cookie is set when the GA.js javascript library is loaded and there is no existing __utmb cookie. The cookie is updated every time data is sent to the Google Analytics server.
30 minutes after last activity
__utmc
Used only with old Urchin versions of Google Analytics and not with GA.js. Was used to distinguish between new sessions and visits at the end of a session.
End of session (browser)
__utmz
Contains information about the traffic source or campaign that directed user to the website. The cookie is set when the GA.js javascript is loaded and updated when data is sent to the Google Anaytics server
6 months after last activity
__utmv
Contains custom information set by the web developer via the _setCustomVar method in Google Analytics. This cookie is updated every time new data is sent to the Google Analytics server.
2 years after last activity
__utmx
Used to determine whether a user is included in an A / B or Multivariate test.
18 months
_ga
ID used to identify users
2 years
_gali
Used by Google Analytics to determine which links on a page are being clicked
30 seconds
_ga_
ID used to identify users
2 years
_gid
ID used to identify users for 24 hours after last activity
24 hours
_gat
Used to monitor number of Google Analytics server requests when using Google Tag Manager