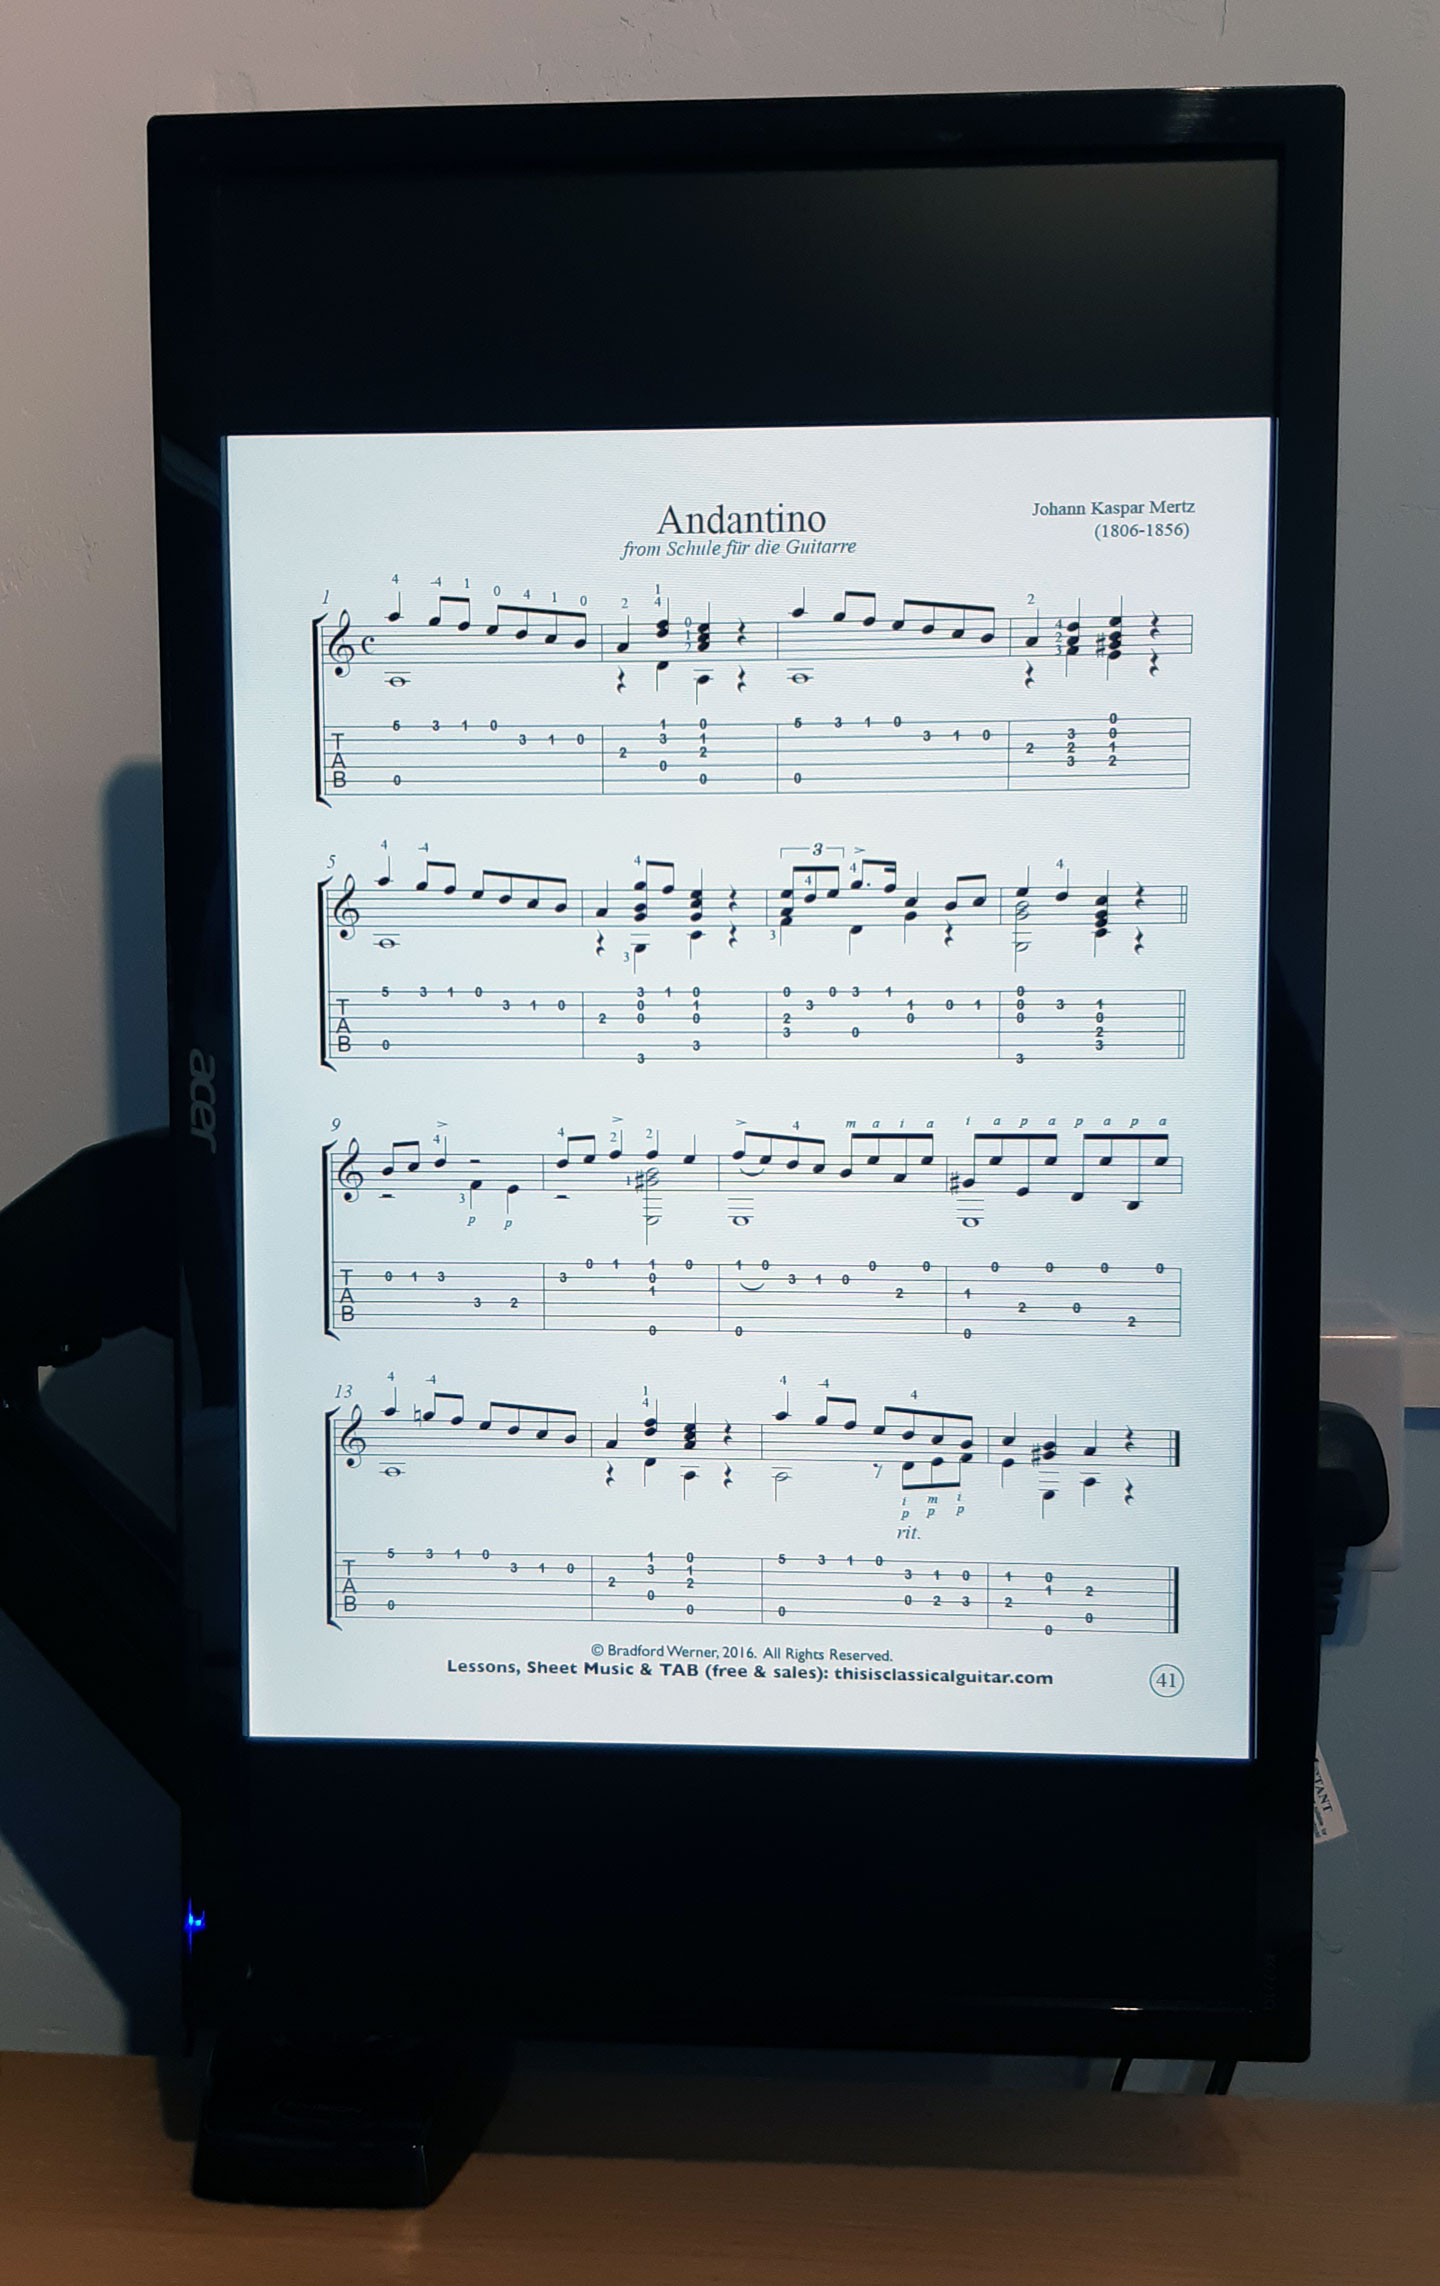
Today I installed a Full Motion PC Monitor Arm to my desk so that I can rotate my PC screen to read sheet music easily.
As I have been doing more teaching from home, and also have had more time to practice my instruments, I have been getting increasingly frustrated when reading music, because in Landscape mode it involves a lot of scrolling. You have to scroll much more frequenly than if the screen was in portrait mode.
I asked my techy gamer friend which one she has in her setup that I have seen, and she said to get this one, so I did.
Moving the monitor and benefits
I can now move the screen into portrait and load up a guitar book pdf and play away. You can go into full screen mode (Ctrl+L) and then press the down arrow key to move to the next page. Or you can use one of the other viewing methods without full screen mode and that way you can see a bit of the next sheet, and then press the down arrow to scroll or PgDn button to jump lower, or use the mouse.
To move the monitor, you can grab the screen and twist it around to make it portrait or landscape, or anything in between. You can also tilt it forwards and backwards and also move it left to right so that it can face someone to your left or right. This I think will come in very handy, because when I have been doing skype lessons on drums, I have been dragging my monitor around to face the drums, so this will be much easier, as you ust move it and then it stays in that position, so no screwing etc to move it.
How to change from Portrait to Landscape
To change the screen orientation to portrait in windows 10, you can right click on the desktop and click ‘Display Settings’ and change it there. My graphics card doesn’t allow the hotkey to change it annoyingly, but most people can change the screen orientation by clicking Ctrl+Alt+arrow keys.
Other Uses
The arm will help in lots of other ways too, like moving the screen so I can see it from the floor for workouts. I have been using the office to do home workouts from centr.com (unleashed and the da rulk masterclass have been enjoyable) and some others like Shona Virtue’s Fitness Programme after purchasing a cheap 8kg kettle bell from Aldi (was a rare find as weights were scarce).
I’m sure it will come in handy for positioning the monitor for gaming too, with a particular interest in F1 games.
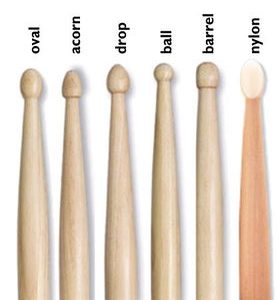
There are six parts of a drumstick. The tip strikes the drum. The neck is the thinnest point. The taper is where a stick thickens and widens. The shoulder is the thickest end of the taper. The shaft is the main body of the stick. The butt is the part you hold.
When you first start playing the drums, it’s easy to assume that picking up a pair of drumsticks is the simplest part of learning to play the drum kit.
After all, aren’t different drumsticks pretty similar? And why do I have to learn about the parts of a stick? Isn’t it the drums that will really determine how you’ll sound?
Surprisingly, the pieces of wood that come between you and your drums can have a huge impact on your tone, feel and ability to play the music you love.
Drumstick anatomy can seem complex, but fortunately, there’s really not too much to learn.
This article will take you through everything you need to know, so you can sound like a seasoned expert wherever you go.
A great place to start is a quick overview of the entire drumstick.
Neil Larivee from the iconic drumstick company Vic Firth takes us through the various parts of a drumstick in the helpful video below.
He doesn’t mention the butt of the stick, but it’s such a common term that I decided to include it in this article.
Learning more about how a drumstick is designed is essential for finding the pair of sticks that suits you best.
If you’re a rock drummer, you’re going to need a pair of rock drumsticks that can compete with the volume and intensity of a loud band.
Yet, if you’re a jazz drummer, you’re going to need a pair of jazz sticks that give you a crisp, light touch on the drums.
Understanding the parts of a drumstick, and how they differ from stick to stick, is key to getting the right tools for the job.
First and foremost, it will allow you to make a more informed choice every time you visit the music shop.
You’ll be able to compare different brands, makes and models and understand more of the key differences between them.
What’s more, you’ll be able to speak a common language with other knowledgeable drummers, and this allows you to benefit from their experience.
So without further ado, let’s get into the nitty gritty of what makes each drumstick unique!
The Tip
wooden vs nylon drum stick tips
The first and arguably the most important part of a drumstick is the tip.
The tip of a drumstick is the area of the stick that is most commonly going to be coming into contact with the drum.
As a result, the shape and style of the tip has the most direct impact on your sound.
Different shaped tips bring out different sounds from your drums.
Some produce a darker, warmer tone, whereas others are more defined, with a sharper and brighter sound.
Why do different tips produce different sounds?
Here’s the clever science bit: It’s all to do with how much of the surface area of the tip comes into contact with the drum.
Some stick tips are shaped so that only a tiny amount of the stick tip will actually touch the drum.
This produces a lot of higher overtones, producing a brighter sound which is more defined and more easily heard in the mix of the music.
On the other hand, some stick tips have a much wider surface touching the drum, increasing the number of lower overtones in the mix.
This extra surface area often provides a fuller, more rounded tone; while not as defined as the brighter stick tips, many drummers prefer this extra warmth to their drum sound.
Different Drumstick Tips
Here’s a breakdown of all the different drumstick tip types you’ll need to know.
Drum companies are always designing new variations for drumstick tips, however, most typically fall into a number of popular categories:
types of drum stick tips
Ball: A ball shaped tip is a useful tip shape because it provides incredible consistency to your playing.
The tone you produce with this stick tip is likely to be very even and well-balanced.
Why? Because the amount of surface area that comes into contact with the drum you are playing is always the same.
This is because it has a perfect sphere shape (shown above), so whatever angle you hit the drum at, you’ll get the same amount of stick surface area coming into contact with the drum.
Pretty neat huh?
As a smaller stick tip, the ball shape provides a bright, light and crisp sound.
Oval: The oval tip is a really expressive stick shape, providing great variety in tone to the drummer who plays with them.
In contrast to tips like the ball shape, you have a lot of freedom with the sound you choose to generate every time you sit down to play.
You can play your drums at different angles to change up your tone pretty easily with this stick.
If you’re not sure what tone you like, try an oval stick.
You’ll have access to a wider range of overtones with this stick.
It’s a great stick shape to experiment with and unleash your creativity.
Acorn: Acorn tips typically have a large surface area that comes into contact with the drum.
This produces a fuller, fatter sound with a nice rounded mix of tones.
Simply put, the acorn tip is a heavy lifter in the world of drumstick tips, and it’s well worth having a pair of acorn tips in your stick bag.
The acorn tip is versatile enough to suit most musical styles and genres, and as a result is widely used by the top drumstick companies.
Drop/Teardrop: You’ll find this shape on the most popular drumsticks ever created (the Vic Firth’s American Classic 5As), and it’s easy to understand why.
Like the acorn tip, it has a large surface area coming into contact with the drum, providing a warm, full and highly desirable tone.
Like the acorn, you can use the teardrop in many musical situations, making it another top all-round choice.
A useful thing to know is that if you like the tone of a particular drum tip, you can customise that stick to the kind of music you play by changing the size of the stick.
So if you’re a fan of the teardrop shape but need a stick with a big more oomph for loud musical settings, you could choose a 5B stick over a 5A stick.
Barrel: The barrel tip is small and fat.
It provides a punchy sound favoured by some of the world’s top drummers.
Take a look at legendary drummer Steve Gadd rocking out with a pair of barrel tip drumsticks in this epic drum solo.
The barrel tip is great for producing a high-quality recording sound in the studio, and therefore is favoured by a great session drummer like Steve.
Nylon: While you’ll find wood tips on almost all drumsticks, there are alternatives that drummers sometimes prefer.
Whereas we’ve been focusing mostly on the shape of drumstick tips so far, choosing a different material for the stick tip has a significant impact on the overall sound.
Nylon tips produce a brighter sound than wood sticks on average for stick tips of the same size.
In particular, they are able to generate a sharp ‘ping’ sound from playing the cymbals.
This can help drummers be heard more clearly, particularly when playing in noisy environments.
Nylon tips also tend to break less easily and don’t wear down like wood tips do.
Editor’s Note: If you play heavier music such as rock or metal, you may find the tone of the snare drum and tom hits less pleasing, and even worse, the tips can fly off. You could try using some strong glue if this happens, but in my experience, wooden oval tips are the way to go for heavier styles just because the overall sound suits the styles better.
Can I hear an example of the differences between the tips?
You certainly can! Have a watch of this great video that provides real examples of different stick tips in action.
The neck is the thinnest point of the entire drumstick. You’ll find this point just behind the tip of the stick, before the stick thickens and widens.
Thicker stick necks are more durable and likely to make your stick last longer, but this can make the stick feel clunky and unresponsive.
There was a time when drumstick necks would break regularly and the drumstick tips would just fly off, but the reliability of drumsticks has improved greatly over the years.
Most of the time, you don’t need to worry about this one point on the drumstick.
If you’re breaking your sticks a lot, you’ll probably want to choose a larger, thicker drum stick.
The Taper
The taper is where the stick thickens and widens, from the neck all the way up to the shoulder of the stick.
The design of this part of the stick has a big impact on the playability of the stick, giving a stick part of its unique feel when you strike the drum.
All drumsticks have a different “feel” to them.
Sticks that are thinner and longer are often described as highly responsive sticks.
Heavier and shorter sticks provide more power, but are stiffer and harder in the hands.
A shorter taper will favour a drummer who prefers to have more power and a longer taper will favour a drummer who prefers responsiveness.
There’s no right answer when it comes to choosing a style of taper that you like.
It’s likely that you’ll develop a personal preference depending on the music you play and your own playing technique on the drums.
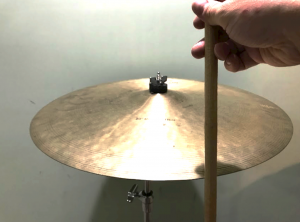
The Shoulder
The shoulder of the stick can be found at the end of the taper, where the taper has reached its thickest point.
The location of the shoulder is determined by how long the taper is.
So the longer a taper is, the further away from the tip the shoulder is.
The shorter the taper is, the closer the shoulder is to the tip.
This part of the stick is mostly used for a single drum technique, which is to “crash” a cymbal.
Rather than playing on the top of a cymbal with the tip, we can get a much warmer and washier sound by striking the side of the cymbal with the shoulder of the stick.
In the video below, you’ll hear the difference that playing a cymbal with the shoulder of the stick produces.
The first time the drummer plays the cymbal, he uses the shoulder.
Tip: When “crashing the cymbal with the shoulder of the stick, make sure to avoid hitting the edge of the cymbal at too sharp an angle.
The stick should never be at 90 degrees like this. Your drumstick (or cymbal!) is likely to break very quickly!
Here’s how your stick should look as you strike the cymbal with the shoulder.
Hitting the crash with the shoulder of the stick
The tip of the stick never touches the cymbal, only the shoulder.
The Shaft/Body
The shaft or body is the main thick section that provides most of the weight to the drumstick.
The thickness and weight of this area will have a big impact on how the stick feels to play.
Thicker sticks, such as 2Bs and 5Bs, will deliver a huge amount of power thanks to their increased weight, but can be difficult to move around the kit.
Lighter sticks, such as 7As, are great for more complex and intricate drumming, but deliver less power.
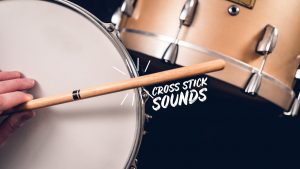
There are two occasions in which the shaft of the stick comes into contact with the drum.
The first is when using the crosstick technique (shown below) which creates a rim-clicking sound, popular in jazz, ballads and music that requires less volume.
cross stick snare drum hit
In the crosstick technique, the stick is turned around the opposite way to play.
The tip of the stick sits in the centre of the drum; the drummer then controls the stick with a light grip to knock the body/shaft against the rim.
Editor’s Note: You don’t have to switch the stick around, it just sounds cool if you do. If you are playing a piece that requires switching from normal snare to cross stick snare, don’t worry about swapping in the stick around to play the cross stick.
The other time that you would play with the body of the stick would be when playing a rimshot.
snare drum rimshot
When playing a rimshot, you strike the centre of the drum and the rim of the drum simultaneously.
This creates a much more powerful and defined sound, ideal for rock, metal and any genre that requires a punchier style of drumming.
The Butt
The final area of the stick is the butt end, where we will be holding the stick most of the time.
There’s no defined point at which the body of the stick becomes the butt, but we just think of the butt as the end of the stick that is the thickest.
Sometimes, drum companies will put a coloured grip or texture on the butt end to help drummers keep hold of the sticks during intense practice sessions and performances.
On occasion, drummers will turn their sticks around to play with the butt end instead of the tip, to get a heavier, fuller sound.
Some drummers go even further, adding a rimshot to the mix as well as using the butt.
They use the shaft of the stick on the rim while using the butt end to play the centre of the drum.
This creates a truly earth-shaking sound; it delivers even more power for drummers that need to be heard in the noisiest musical situations.
In conclusion
I hope you’ve enjoyed this introductory guide to the different parts of a drumstick.
My advice would be to get yourself down to your local music shop, and experience how the various types of drumsticks feel in reality.
You’ll be able to put this information to practical use and find the ideal pair of sticks that suits your playing style and the music you play – taking your drumming to the next level.
Check out this new drumming blog for more helpful guides: if you’ve ever wanted to learn how to read drum notation, the ‘how to read drum music’ guide is a great place to start.
I play some heavy styles and I have found that it is the only 5A pair that doesn’t break. They are so reliable and they will go on and on if especially if you are playing with good technique and hitting the edge of cymbals with the thicker part of the stick (on the shoulder).
Playing drums requires a little bit more physical effort than many other instruments. While many instruments require correct breathing and fingering techniques, and some utilize pedals as well, drummers are constantly using their whole body, including not just fingers or hands, but the whole arms and both legs. This is why drumming for prolonged times is very draining, especially at higher speeds.
Certain genres of music have high tempos as a defining trait. Speed metal, techno, trap and some types of folk music require you to consistently play 16th notes (or even 32nd notes!) at very high BPMs. But even classic rock or chillstep songs can have faster passages, sometimes known as speed-bursts, or a very intricate drum solo that is hard to execute because of the combination of speed and unpredictable, almost pattern-less lines.
Getting up to speed is not exactly easy. It is required that you physically practice playing at higher speeds, that you understand how muscles work, and to mentally recognize, feel and hear the 16th notes even at very high speeds. It is definitely a steep learning curve.
So, where to start? How about relaxing a little bit first.
1) Learn to play slow and precise:
This is a tip that has been repeated so often that it has completed its route from being the most popular advice to being the most hated one. Yes, learning to play slow will not increase your speed directly, but that is not the point. The point is to hear the beat and to get accustomed.
By playing slow, we mostly mean playing at slower tempos. Keep in mind that while playing at slower tempos, you can still add in speed bursts in form of 16th or even 32nd notes. That means that at a lower BPM, you can still play faster than when you play a high BPM. 16th notes of a lower BPM are still faster than many 8th notes of a high BPM. The low BPM simply makes it easier to get into the whole speed-game and it enables you to actually feel what you’re playing.
2) Relax your muscles as much as possible:
The second reason why you are supposed to slow down at first is to learn to relax. At higher speeds, we tend to tense up, and tension slows us down. So, to be able to play fast, you need to learn to control your movement, breathing, and tension. This requires a lot of mental effort and will take some time to get accustomed to.
Playing relaxed doesn’t mean playing quietly or slowly, though. It means that you are simply not straining a much as you probably do right now.
3) Start off slow and increase the BPM:
This is another widely repeated advice that is not wrong and that it is helpful, but please keep in mind that this is only part of the whole learning process. Learning a song part at a lower BPM, then increasing it is going to help you track your movement and get the precision down before getting the speed under control.
You can even take songs that you know and “over practice” them to get them down properly. Many rock acts play their songs at higher tempos live, which is both a way to reduce the duration of the venue and fit in more songs, but also gives a certain kick to the songs that are increasing the unique feeling of a live concert. Practicing along recordings of live performances might be a good idea for you.
4) Practice smaller parts at high tempos:
While learning how to play a hard drum solo slowly and then working your way up the metronome, another way is to learn the solo part by part with very small segments played at the correct tempo.
This will help you get down the movements at the correct time and then all you have to do is put them together. This is very effective and becomes even more useful once you get better and playing fast because you will be able to learn and master solos this way much faster.
5) Practice speed bursts and double the amount of notes:
Another way to use lower BPMs is to practice speed bursts. Add to your patterns a small and short solo line or bridge that lasts only for one bar or even less. Or double the number of notes.
This can be done by simply doubling what you are playing. For example, instead of a single kick, you can either play with a double bass drum set very fast or use a double bass drum pedal to add a second kick to the first one.
You can also create more solo-like lines from time to time. Lastly, you could try to consistently add a cymbal throughout the whole song, essentially changing the 8th note feel to a 16th note feel, though doing this consistently might not be very musical and also very difficult to pull off.
6) Be comfortable with your gear (Bonus)
As mentioned in the beginning, being relaxed is very important. This includes being used to your gear. Make sure you find the correct type of sticks and the best throne that fits your needs.
Experiment with different drum setups and don’t be afraid to change up your layout. Getting two bass drums or a double kick pedal might seem like a big change, but everything can be learned and mastered. Some setups work better for faster styles than others, so make sure to check out and draw inspiration from jazz, prog, and metal drummers to see how they are dealing with faster parts.
Summary:
Learning to play fast cannot be done in a day, and mastering high BPMs can take a very long time. One thing that is sure is that it can be done with enough practice and patience. Try out different methods and don’t be afraid to search for inspiration out of your comfort zone. There are many different genres that utilize fast drum lines, so try expanding your musical repertoire. And should you get stuck, don’t panic.
Stagnation is a normal phase that we all go through from time to time and sometimes it can feel that you haven’t progressed in weeks or even months. But this will go away. Play fun songs that you are comfortable with and with each song, your brain and muscle memory will passively pick up certain details that will help you increase your speed later on.
Peter has a passion for music since he was 12 years old. Enjoying jamming and teaching, he runs Net Sounds Music, a space to learn and get involved with music.
A note from learndrumsforfree.com – Many thanks to Patrick for writing this article. I can certainly say that playing drums helped me get through my teenage years. I also think as an adult, stresses can get intense in many different ways and that drumming is an excellent and fun way of releasing stress. Before you read the article, I would like to draw attention to the word ‘Relieve’ in the title, because it’s important to note that this isn’t going to be a total fix, but it could be one of the things that helps. One point that I would like to add is that if you already can play the drums and haven’t been playing them much for a while, and you have stress and anxiety in your life, then I can’t think of a better reason to get into a regular practice routine. See if it helps.
There’s meditation, exercise, and holistic diets to help people with mental health issues–but one overlooked hobby to help reduce stress is playing a musical instrument, particularly drums. What are some of the mental health benefits of playing drums? Read to find out more.
When people think of musical instruments, they immediately associate it with talents or passion. A person usually plays drums because it’s their life calling–though it can be an exaggeration at times, this is true for the most part.
However, playing drums can also serve not just as a hobby or passion, but rather as a catalyst for change in terms of mental health. With mental health problems on the rise such as anxiety and depression, people are trying to find healthy, non-medicated ways to deal with their condition.
The current state of mental health problems
Anxiety disorders are considered one of the most common mental illnesses in the United States. Almost 20% of the country’s population have been diagnosed with anxiety disorders, and the numbers continue to rise. This also excludes people who show anxiety or depressive disorders without going through a proper medical diagnosis.
Mental health problems can be quite a challenge to detect and manage because unlike physical diseases, their symptoms can be subtle or deliberately hidden from others. Some people who go through mental health issues can often be scared to come out due to the negative stigma associated with conditions such as anxiety or depression.
Some of the common signs of anxiety and depression include:
Constant rumination of worries that snowball and get bigger and bigger
Breathing problems
Panic attacks
Feelings of paranoia
Lack of interest in daily activities
Overeating or loss of appetite
Feeling hopeless, down, or distressed for prolonged periods of time
Thoughts of self-harm
Irritability towards others
Easily agitated
Difficulty coping with responsibilities
Remember that the symptoms of anxiety and depression can overlap. Since anxious people are often depressed, they also tend to seek unhealthy coping methods such as addictions or self-harm. If you think that you or a loved one’s life may be at risk, don’t hesitate to seek help right away.
The best way to deal with mental health problems is to seek medical attention as soon as possible. A psychiatrist will be able to recommend specific strategies, both through medical interventions and therapeutic strategies to help address the condition. Some of the most common strategies to help people with anxiety is through pursuit of hobbies and interests. Anxiety disorders can be relieved through art, music, or movement.
How does playing drums help relieve stress and anxiety?
Vibrations and beats can help reduce stress levels in the body.
Although drums are not considered part of the melody and you can’t really think of notes and tunes, it is true that vibrations and beats can still help reduce stress levels in the body. This is because the rhythm being introduced auditorily helps release the antibodies called immunoglobin A. Immunoglobin A is a substance that helps reduce cortisol levels. Cortisol is a responsible trigger for stress and anxiety.
When cortisol levels are continuously high, the body responds through various physical and mental symptoms. You may be prone to more infections, be at risk for cardiovascular diseases, and also develop anxiety disorders. Playing drums and learning to follow through rhythms can help boost antibodies for your overall wellness.
Drumming is a physical activity.
It’s no longer a mystery with how physical activity can help relieve mental health problems. This is because when we exercise, our bodies release neurochemicals such as dopamine and serotonin which are considered “feel-good” substances. These chemicals are naturally released in the body which provides us with vitality and elevated moods.
Thus, drumming can also be an option for people who want to hit three birds in one stone–those who want to relieve mental tension, learn a new skill, and burn calories all at the same time! One hour of drumming can help burn about 250 calories for an 180 lb individual. Some common cardio exercises like indoor cycling, running, or dancing can produce identical results. If you’re musically inclined but want to be physically active, then drumming might just be the perfect hobby for you.
Playing drums is also a mindfulness exercise.
One of the roadblocks to curing anxiety and depression is constant rumination of past experiences or worries that are in the far future or non-existent. Mindfulness is the principle that helps people think of the present moment to release their thoughts and feelings from forming irrational responses.
Playing the drums means learning how to tap or respond to the rhythm being played, or being able to set a consistent pace. This requires the brain to think of the present with complete focus in order to avoid losing the beat. In a way, playing the drums can be a great way to include as a part of one’s mindfulness routines for treating anxiety and depression.
Playing through rhythmic music can make you smarter.
It may be puzzling to see a connection here, but it is good to know that researchers saw a correlation with increased intelligence scores and playing to rhythmic music such as tapping the drums. It is apparent that keeping a steady beat helps develop the brain’s problem solving skills.
Often, people with anxiety or depressive mood disorders can have a lack of self-worth. They would often feel unaccomplished or unable to ‘match up’ to other people in terms of their skills and accomplishments in life. Playing the drums can serve as a way to boost one’s confidence and motivation to continuously pursue a potential musical passion.
Playing the drums can be a social activity.
Music is a universal language–it transcends language barriers and helps people connect despite their diversities. Listening to music, playing music, and enjoying music together is one of the best social activities one can engage in.
When people play drums, it can be an open door to form friendships, share life experiences, and simply enjoy the presence of others through music. Thus, it can be a helpful social activity that can reduce anxiety and depression.
Drum your stresses away
Sometimes, passions are discovered in the moment. If you are on the fence about the exploring the wonderful world of drumming, perhaps you can give the hobby a try as a stress reliever. Who knows? It can help give a sense of fulfillment that you may not have experienced if it weren’t for picking up that drumstick or trying out that first tap.
Lots of drummers are all too happy to play without much consideration for proper drumming posture. After all, it’s not as much fun to take a sensible and well thought out approach before wailing away at the drums!
However, it is very important. This is because injury prevention is the single best way to ensure you remain healthy, fit and active. Improper posture can cause back injuries, hypertension and poor mobility.
Not only is it important for promoting positive physical health, but also for improving performance. Playing the drums with correct form and posture will allow a drummer to play with greater fluidity and exercise better control behind the drum set.
Being able to play the drums comfortably will translate to how you perform for each rehearsal and performance.
The foundation of correct drumming posture lies with the drum throne and the height it is set at.
Drum Throne Height
This is the most overlooked aspect of maintaining a good drumming posture, and I see far too many drummers sitting at an incorrect height (in correlation to their own frame) whilst playing the drums.
The drum throne is required to be positioned according to a drummer’s own height. This means if you are 6 foot you will position yourself much higher than someone who is only 5 foot 5. Drum thrones have a large range of height adjustment so don’t be afraid to experiment and see what works best for you.
Frequently I see tall drummers sitting far too low down and because their legs are far more extended out and then find themselves having to reach further to play the toms and cymbals within the drum set.
As a general rule, you will want to have your knees sloping downwards at a slight angle. You will want your spine and lower back sitting above your knees. So this means avoiding having a 90-degree angle for your legs.
Being sat at the correct height means you can also comfortably reach all the drum set components whilst conserving energy.
Once the drum throne is a correct height, the pedals will be required to be positioned to exactly where the feet fall naturally. And the batter head of the snare drum should sitting around 1 or 2 inches above the knees.
Invest in a Supportive Drum Throne
Good quality drum thrones offer superior comfort and support to cheaper alternatives. Quality thrones feature high-density foam cushions that support weight evenly and retain its original mass and shape for years without warping, breaking, or become uneven over time.
The base of a good quality drum throne is far more stable compared to cheaper drum thrones and this is vital for good posture. Cheap stools wobble and make a drummer unbalanced and unstable around the pelvis area and this can pose a huge risk to injury.
There are high quality drum thrones available to suit all different levels of budgets. Even if you have a small budget, there are supportive and comfortable options to choose from.
Drum Throne Height Adjustment
Drum thrones across the board will all feature different height adjustment mechanisms to raise and lower the height of the stool accordingly. Here are the various types of height adjustment mechanisms found in drum thrones:
Nut & Bolt-Lock (Avoid)
This is a mechanism exclusively found in insufficient, low quality thrones that are to be avoided at all cost. Every single cheap stool will use this type of height adjustment and you can guarantee it will wobble and break. They provide terrible posture and have very limited height options.
Sliding Tube & Memory Lock:
This type of mechanical height adjustment is fairly straightforward. It’s the same as found in cymbal stands. You are easily able to loosen a clutch that rests underneath the seat and you are able to slide up or down the metal tube to your desired height.
Spindle Adjustment:
The threaded spindle adjustment is a popular mechanism for drum thrones. It is very simple to use, you are able to adjust the height with a single hand by spinning the seat top either clockwise or anticlockwise depending on if you would like to raise or lower the height. This is the easiest and most popular mechanism offering unlimited height adjustment.
Final Thoughts
A drum throne and its settings are sadly a very overlooked aspect of drumming that is, in my opinion, essential to allow a drummer to play at his best. And perhaps more importantly minimizing the risk of injury caused by poor posture.
Good drum thrones offer a wide range of adjustment, so I would encourage you to experiment with heights and seeing what works best. I find that more often than not the problems are with drummers sitting too low down as opposed to being higher up.
When raising the height of a drum throne you will also be required to raise the height of the drum set components including snare drum, hi hats and cymbals so you aren’t stooping lower to have to reach them.
I have personally found that sitting higher has improved my playing, allowed me to be more relaxed and has put less stress on my legs and shoulders.
And of course, develop good habits by remembering to sit up straight with your shoulders held back and relax your arms whilst you play.
Blurb
Gideon Waxman is a London based drummer with over 13 years experience, and is the drummer of metal outfit Familiar Spirit. You can find more of his tips at Drum Helper – a free online resource dedicated to helping drummers achieve more from their playing.
When picking out or setting up a drum set, a lot of people run into challenges during the process. Unfortunately, this is because they do not know what to look for.
People struggle with how much money to spend, what they should be concerned with, and what will make their experience the best one possible.
With many newbies never playing drums in their life before, they do not even know what sound they are going for with their drum set. This can be a very, overwhelming experience.
Drumheads are one of the most overlooked parts of the drum set. In reality, the thicker the drum head, the darker the sound becomes. In turn, there is a low amount of resonance, but a higher pitch overall. Currently, some of the head options you could look into include Evans and Remo.
On the other hand, if you are someone who likes the sounds of a thinner head, then you probably like a bright sound. With extra resonation, these drum heads do not need much to make an incredible sound. Drummers, who use these types of heads, usually are playing in a quieter atmosphere, where the drums do not need to be played loud.
One of the last drumhead decisions you should consider is whether or not you want a coating on your drumheads. Having a coating is great for adding a darker sound, so pairing with a thick drumhead can create amazing controlled action. Without a coated head, you can expect a great attack and bright sound. Usually, coated drumheads are seen on the snare drum.
The Right Size
Some people may see a drum set and just expect it to be good, but there are actually a few decisions that will make your drum playing experience a great one. If you are into jazz music, a four-piece trap will do the trick nicely. The bass drum needs to be either 18” or 20”, the toms can be 10” or 14”, and a 14” snare is best.
Other kits, like the 5-piece variety, usually have a bass drum at 22”, toms at 12” and bigger, and a 14” snare, similar to the jazz trap set-up. With a bigger sized drum kit, drummers will not be limited to one style, but a multitude of styles.
Not everyone is up for a 6-piece set, but you might be interested. If you are looking for great flexibly, you can add a 16” tom for the floor to play any style of music on the planet.
Marvelous Materials
With anything, some people are not really concerned with what things are made of, but rather if the product works and if it is efficient for what it is used for. However, you should be aware of what shell material your drums are made out of.
Let’s start with maple. This material is perfect for jazz and acoustic sets. If you are looking for a material that brings the punch, birch is the material for you. Additionally, there are hardwoods, like mahogany, that provide a great tone, too.
In terms of price, birch and maple material will be the most expensive, so some first-time drum buyers might steer clear because of the cost. Before purchasing, consider demoing the material and then make your crucial decision. This can be a fun, yet informative experience that will only take an hour or so.
Extra Hardware
Drum heads and drum material barely scratches the surface with any drum set. You will still need to purchase things like the throne, stands, and pedals. With the throne, this is an item that gets a lot of use. Make sure that you pick a throne that is comfortable to sit on. Your backside will appreciate it. Look into thrones like Tama, Roc N Soc, and Pork Pie.
A high-end bass pedal should also be on your radar. This type of pedal can adapt to any type of style, and it can last a lifetime. Look into brands like Tama, Mapex, and Pearl to help you on your way.
The last hardware of importance should be the stands that hold your drums and cymbals. Sure, many of the sets that are purchased today come with stands, but usually they are low-end.
Upgrading this part of your set can go a long, long way. Some people look for durability in their stands. This is when double-braced legs are your best friend. If you move your trap around a lot, use legs that are single-braced.
Sensational Cymbals
The last piece of the puzzle involves cymbals. Picking the right cymbals really personalizes your set. There are two different cymbal materials to choose from: bronze that is casted and sheet bronze. Casted bronze has a wide-ranging tone, while sheet bronze is more inexpensive with less tones to account for.
When it comes to casted bronze, check out brands like Sabian and Zildjian. On the other hand, for sheet bronze, identify brands like Paiste, Zildjian, and Sabian. By investigating these brands, you will have a group of cymbals that mess well with one another, depending on your decision.
The Big Finish
With all the information above, you will definitely not be frustrated with your first-time drum buying experience. Ultimately, remember that your best option is to check out sound demos, go to a local shop, or try a friend’s trap out for good measure.
Do not just go through the process in a hurry. The more time you take, the better you will feel about your purchase. Then, you can just enjoy your drums and get to work honing your drum skills.
Acoustic drum sets are very difficult to replicate electronically in both presence and sound. However, they do not always contain enough variety to meet the sonic expectations of modern audiences.
This poses a problem for modern bands. Full electronic drum sets are often ruled out as an option for many valid reasons, but what about getting the best of both worlds? This is where Hybrid drums come in.
Hybrid drums are the fusion between acoustic and electronic drums. Drummers simply augment their current drum kit with electronic elements such as triggers, pads, and drum modules.
These setups can get very interesting, particularly when you interface the electronic drumming elements with other music gear and DAW software on your computer using MIDI.
This article also explains the benefits of hybrid drumming for live sound, particularly when it comes to the punch of your bass drum for smaller live performances.
Using electronic elements in your drum set
Hybrid drum kits do not often come as one big package. The items are generally purchased and organized separately. This is all about creativity and personalization.
Electronic drum pads are a great and simple option to start implementing electronic sounds. You can place pads such as the Roland SPD-SX or Yamaha Multipad right next to your drum set and hook it up to the PA system.
These types of pads can produce a very wide variety of sounds, such as claps, percussion, bass notes, synth loops and much more. You can also import your own custom sounds or hook the pads up to other gear or production software using MIDI.
Another fantastic option is through the use of drum triggering technology. These simple items attach to drum heads and can trigger external sounds on other music gear. You can usually even connect them to your sample pads.
One of my best tips is to mount a dual-trigger to your snare drum. This makes the snare rim a separate triggering surface that you can use to produce a clap or other effect sound.
Trigger bars and pads are useful for electronic elements that you can place in convenient locations around your drum set. These can be great for discrete electronic additions to your kit.
Triggers and pads require a sound source. This can be done using an electronic drum module, a drum trigger module, a sample pad, or other music gear.
If you already own an electronic drum set, you could use the ‘drum brain’ from this as your sound source.
Combining elements in the live mix
Acoustic and electronic elements can be combined nicely in your live mix using hybrid drum setups. For example, you can set up microphones on your acoustic drums while also amplifying sounds from your pads and triggers.
If you are mixing two sounds together, it is useful to blend the electronic sound in. For example, a good quality drum trigger modules allow you to alter the pitch of the electronic sample to match the sound of the drum head.
The most practical use for this is the kick drum in live performances. Drummers that need a serious punch sound out of their kick drum are often disappointed by small venue sound systems. Blending a triggered, club-style electronic kick sound can often achieve very impressive results.
Many metal drummers have been using triggers on their drum heads for years. However, this has caused some controversy because drummers have been using them to compensate for lack of power when executing fast double-kick strokes.
The best music genres for hybrid drumming
Genres that contain strong electronic elements such as pop and dance are perfect candidates for hybrid drum sets. Drummers can trigger samples and effects that are relevant to the style.
Hybrid elements are especially interesting for experimental acts and live electronic music producers. The modular nature of these items often fit very nicely with these setup types.
However, more subtle uses of hybrid elements can be used across a wide variety of music styles. For example, drummers for wedding and cover bands could opt to trigger their drums instead of using microphones. This could improve their live sound, as well as making sound check and pack down a whole lot easier.
Using a full electronic drum set
The majority of drummers do not consider electronic drum sets as an option for playing drums live. However, top-end sets can actually simulate standard drum sets extremely well. They also work great in spaces where an acoustic set is simply not an option.
If you are in doubt, try out the current top-end electronic drum sets such as the Roland TD-50 or the Yamaha DTX900 in a local music store. These resemble nothing like the kid’s toy image you might conjure up when thinking of an electronic drum set.
These might set you back a lot of money, but they are the closest we currently have to electronically simulating a full drum kit. Check out this guide on Electronic Drum Advisor to explore these options.
Conclusion
There are some disadvantages of electronic drums over regular kits. The cymbal pads can sound a little fake and the kick pad can lack the presence of a 22-inch bass drum.
However, combining what’s great about electronic drum sounds with your acoustic drum kit is the best of both worlds.
Using electronic elements can improve the range and quality of sounds for your live performances. You can start with a few small items and then expand the sound of your kit from there.
I’ll start by saying I am very glad that I chose to have the ACL reconstruction operation after injuring my leg playing football and for anyone considering not having it done after injury I will say that it’s very much worth doing. There are risks as with any operation but they are fairly minimal and I certainly wouldn’t have wanted to go the rest of my life with an unstable knee. Whilst I’m not glad I injured it in the first place, I do see it as a blessing in disguise with how my life has changed following the operation.
When I injured myself playing football, the leg gave way when I pivoted to pass the ball with a lot of sideways momentum. I had ironically been pushing myself hard that week to get fitter so maybe some of my supporting muscles were a bit fatigued, which made it vulnerable.
After about 9 months of being misdiagnosed by physiotherapists and doctors, I contacted the doctor’s again and was referred to a senior physio who then referred me to get an MRI scan as a precaution but still thought it would be fine. At a similar time someone that had my injury before said exactly what it was following my description to them. After I later found out that this was correct it did surprise me that 3 physiotherapists and 2 had failed to pick up on even the possibility of it being the ACL (Anterior Cruciate Ligament). One said it could have been a dislocated knee cap or that I just jarred the muscles. I did tell them my leg went out to the side and back in again and then huge swelling and pain but unfortunately, no dice.
Up to the point of the MRI scan my knee had given way a few times under general moving about too quickly or attempting to jog. I kept on with the drums though because drumming with the legs is all straight line movements to the kick pedals, so it giving way was not really an issue.
The MRI scan was great. As a musician I wished I had declined the headphones used to distract me from the sounds because I wasn’t able to move at all to take them off during. The sounds were loud so I still heard them though. The sounds were a bombastic mix of what sounded like sine, square and saw waves from a primitive synth bellowing out at me.
When I met with the surgeon to discuss the results, I wasn’t prepared at all to hear that I needed a hamstring graft to reconstruct my ACL ligament through my knee, which would include harvesting my hamstring, braiding it together and drilling it into a bone in my lower leg with a dissolvable screw and then afterwards the rehab would be 6 months where I would also have to be careful not to damage the work done before it starts to morph into my body with blood flow etc and be strong enough to act like a normal ACL. There would also be risks during the op like blood clots and would be scars (they are barely visible now). Oh and repair my medial meniscus cartilage at the same time but that it may not be repairable and if so need some chopping out. I must have asked for about 3 glasses of water and also for the window to be opened because I felt nauseous.
I decided there and then to go for it after a short time of thinking about bailing and not doing it. At this point I was told to be very careful not to make it worse or the cartilage damage may worsen, so I decided to tell my band I can’t play for a while. I debated keeping going but I was so worried at this point of injuring it beyond repair. We had just released an album and preparing tour dates so it was pretty devastating for all, because it was a couple of months ‘til the operation and then at least several additional months before I would return. I did agree to go ahead with our video shoot though so that we had something else to promote at least online for a while.
The operation process was easy and I was in good hands with the excellent (albeit stretched) NHS and my surgeon was highly regarded from what people were saying.
I was in a lot of pain afterwards and I couldn’t really do much for myself for the first 2 weeks. It was so hard washing and moving around and I was heavily dosed up on painkillers. After week 3 I returned to teaching on crutches and I was kindly driven around by Mum, who took some time out to be there for me. After about 4 weeks I could drive (you have to be able to emergency stop) but walking was still hard and painful.
My physiotherapist assigned to me for the rehab is amazing and she really guided me through the recovery. I have to drive 30 mins each way to go weekly rather than the ones in my hometown but it has been worth it.
I was also offered to be part of a research study, which tests the benefits of building up the good leg along with the injured leg, which I signed up for. I’m not sure if I still would have gotten all the physio sessions if I didn’t, but I’m not sure on that.
The weekly physio sessions started me off into a regular routine of going once a week and then going to the gym for 2 or 3 more sessions in between. It sort of forced me into a healthy routine that I now stick to over 6 months after starting.
Before the operation I had got talking to someone at a wedding that I knew was a personal trainer so asked him what he thought about it all. He said I’d really done a number on it! More importantly he opened me up to thinking about the recovery. He said that the rehab after the operation was so important to get right because if you don’t put in the hard work it won’t recover and might not be as good in the long run.
Following that chat, I was inspired enough to go ahead with booking some PT sessions provisionally for when my leg was able to start taking on extra exercises to the physio’s homework I would get.
After the first 3 months of the 6 month rehab period it gets easier. The first 3 are hard graft and progress is notable but slow. The second 3 months you can really open up and start to do more but still have to be careful of twisting to aggressively and things like that.
Now for me it’s been 6 months and 3 weeks since the operation. I played my first return drumming gig 3 months ago and I’ve been having Personal Trainer sessions for 4 months. I play in a metal band so I use the double kick using both legs but my bad leg is not my lead leg – it’s the hi hat leg. So introduced my bad leg slowly to full double pedal stuff and it was not until 4 months after the operation I felt ready to give it the full beans.
During the time of being cautious with my bad leg I was having the PT sessions and physio too and all the while it was improving, and so was my ‘good leg’.
When I was a teenager I used to have issues with knee pain playing football and it’s only since this rehab process that I have realised that I needed to build up my upper leg muscles to protect my knee. The VMO muscles are key to this from what I have found out.
My PT sessions have really worked on my legs and core muscles and my physio was also focused on general strength including upper body and progressed onto agility work and running / cardio.
I feel that without this injury I never would have got into all this training. Now I can feel my body changing, getting stronger, and I have much more general endurance. Especially for metal drumming. It’s not so much the power but the endurance that is needed to maintain the speed playing, along with good technique.
My quads and calf muscles have been built up quite a bit and now when I drum at gigs I feel I can really rely on my muscle power and endurance to play the parts without fatiguing and feeling pain right at the top of the leg near the groin like I did before all of this.
This has given me confidence to push myself when writing new beats for songs. Before I had been tempted not to push myself too much as it would be hard to play in a long set but now I can really lean on my new found confidence and push the envelope like I did 15 years ago when I was a teenager, with all the energy in the world.
I feel like I’m getting my old abilities back but now I am so much tighter with my experience of recording and gigging, so right now I’m enjoying being better than I ever have been on the drums and feel confident to push it further.
Last week I played a gig and came off stage dripping with sweat and I knew I had never played so hard, with so much energy. I remember hard bits being quite easy and also really unleashing on some sections, throwing out energy to the audience and the band. I think that was my best ever performance, 22 years on from first starting to play the drums.
I will definitely keep up my gym work, and with the guidance of a personal trainer it helps with my motivation to keep it going and to keep everything fresh too. I’ve started to have joint PT sessions with a friend to make it more affordable and sustainable too.
There is so much you can do for free if money is tight, so I really recommend getting stuck into a range of workouts like cardio, weights, agility work using online resources. Don’t just do one – it’s important for men and women to do a mixture of cardio and strength work.
I hope to have inspired you in some way. Don’t wait to get an injury to find the motivation to work on your fitness like I did! Seeing the change in me and how far I’ve progressed from hobbling in severe pain to running in slaloms and doing things like barbell back loaded squats, box jumps and calf raises in months has inspired my partner and friends to get into a regular workout routine too.
I’ve still got some work to do on my knee, hamstring and calf muscles and I’ve only been doing the gym work for a relatively short time so I look forward to seeing what I can do over the next year and onwards.
So now it’s over to you. Unlock more creativity as a drummer by building up your strength and endurance to improve the confidence you have in your own abilities and potential.
Guest blog post by Subreel. Please check out their website for more audio equipment reviews, how-to guides and loads of other musical information.
Being a drummer can make your life awkward, especially compared to other instruments. Your instrument is the hardest to transport, requires a lot of maintenance and expense, and as you may expect, drums are the hardest of the mainstream instruments to record. That said, it has become more simple in recent years and many drummers are taking the opportunity to lay down demos, create backing tracks and self-record for a variety of reasons. We’re covering the basics of doing so, and how you can get started in this article.
The main difficulty when it comes to recording drums is the fact that you need multiple microphones. The various different drums and cymbals, and the huge variety of sounds they create mean that recording them with one mic isn’t going to do it justice, and certainly won’t be usable for professional records. Many musicians have turned to USB microphones in recent years, but that is possibly the more difficult option for drums.
Microphones
You will need a minimum of three microphones.
• At least one overhead mic, and often two. A matched pair of Condenser microphones are standard, this can be as luxurious as AKG C414s, or their cheaper alternative the C214. Alternatively, a budget model such as the MXL990 can do a good job.
• One snare mic. This can be as simple as a Shure SM57 or a similar dynamic microphone. SM57s pick up the frequencies required very well and they’re very durable, so they’re not likely to break if they take an accidental hit or two.
• One kick drum mic, this is normally an AKG D112 due to its immense ability to pick up bass frequencies.
You will probably then want to add more microphones to get more detail in your recording, and more importantly to gain more control. If you record with one microphone you can’t adjust the volume of individual parts of the kit, so your kick drum might disappear, for instance. For this, you are going to need either a small mixing desk (4-8 inputs as a minimum) which you can run your microphones into. Alternatively, drum brands such as Sabian have started providing audio interfaces for your drums, the Sabian Sound Kit. These are a brilliant way to get four of five different mic inputs going straight into your laptop or computer for editing.
Acoustics
When it comes to home recordings, this is the most overlooked aspect. Unless you are lucky enough to live in Abbey Road, you’re going to need to treat the room you are recording in. Acoustics can be incredibly complicated, but just some simple basics can make a huge amount of difference. The room you are recording in should have a lot of absorption. Acoustic treatments are ideal, but if you can’t afford these then simply hanging up some blankets or duvets and filling the room with furniture will do a lot to deflect and diffuse the reverberations of the sound. Even if you think the room sounds ‘nice’, you want the recording to be as flat and dead as possible, reverb, EQ and other effects can be added later but if you get an unwanted reverb you won’t be able to get rid of it.
Mixing and Compression
Without control of the volumes, things can get chaotic pretty quickly. The mixer will serve to allow you to alter the volumes to your liking, and avoid the problem of suddenly having a very loud floor tom, but a disappearing snare. The main thing to worry about during recording is that you get a good, strong signal from every microphone. The levels can be tweaked in software afterwards.
Another essential aspect of a drum recording is compression. Simply put, compression brings the level of the sound to a more ‘even keel’. The louder aspects of the sound will be leveled out and the quieter aspects slightly boosted. In drums, this means that a lot more of the ‘body’ of the sound is brought out and the transients (the sound of the sticks hitting the drums) will be more subtle. Compressors have different presets and controls to allow you to tweak things. You can choose to compress individual tracks or even the whole kit, but our ears are used to hearing compressed drums, and this simple step can greatly enhance your overall sound.
Recording Alone?
Even in professional studios and full-band recording sessions, overdubs and editing are commonplace. There are a few things to consider when recording alone. You don’t have to get it exactly perfect for the whole duration of the song, and replacing missed hits and bum notes is not uncommon, nor is it selling your soul! To make life easier when it comes to layering, recording to a click track (metronome) will help you to stay perfectly in time. This is helpful not only for editing (some will even loop sections of good drumming) but it is helpful for those of us who are liable to speed up or slow down throughout a song.
Practice
Recording is as much of an art as your drumming. You don’t have to become a pro audio engineer to get good recordings, but practicing and experimenting is the best way to get to grips with things and create a sound you are happy with. Different mic positions will work better, different combinations of microphones and experimental room mics can all make a difference to your sound, and the best way to get the best sound is to invest the time into getting it right.
Guest blog post by Subreel. Please check out their website for more audio equipment reviews, how-to guides and loads of other musical information.
Here is a list of 30 essential productivity apps, business management tools and other apps or websites that help to run an online business and a local music teaching business.
The list here is what suits me and keeps me going as an individual business. There are other things I use but these are the main ones. These may not be suitable for everyone but they are all things that I happily recommend to others. Some are obvious, like the google products, but you might find a few that you haven’t heard of in the list.
Below the list is more information about how I use the things in the list to operate my businesses.
1. Google Calendar & synced to phone calendar (scheduling and also useful for setting reminders at specific times)
2. Google Docs / Spreadsheets (for creating invoices, records of who has paid, income spreadsheets). For offline and advanced database use, Libre Office Sheets and Calc are free and are just as good as Word and Excel imo.
3. Google Drive (access everything on the move; lesson plans, ebooks, records of who has paid invoices)
4. Google Keep (for saving photos or notes on the move)
5. Gmail (email)
6. Google Maps & Belkin Phone Holder (replaced sat nav)
7. Google Contacts (can group contacts into categories such as school names)
8. Remember The Milk (to do list, web and mobile app)
9. Mailchimp (mailing lists)
10. Payhip (for selling ebooks)
11. Paypal (payment processing)
12. Bandcamp (for audio downloads)
13. Ditto Music (digital distribution for music)
14. Sentric Music / Hit Licence (pitching music to tv / film etc)
15. BBC Weather Web / App (Try to dress for the weather)
16. WhatsApp (Reluctantly stay in close contact for certain projects)
17. Adsense (advertisement revenue)
18. Phone’s native clock, countdown timer and calculator
19. Heart Internet Web Hosting and Domains (to power the websites)
20. Drupal & WordPress (CMS for websites)
21. Spotify (always have access to songs that I need to teach)
22. DaTuna app (tune guitars using phone – android)
23. Justin Guitar metronome app
24. Abelton Live 9 (Suite) – Education Price (DAW for making music)
25. Dropbox or Wetransfer.com (sending / sharing large files)
26. Landr (Cheap and Easy Mastering Service)
27. Adobe Photoshop & Adobe Illustrator (for all artwork needs such as posters, music artwork, ebook covers, web banners etc.)
28. Adobe Acrobat Pro (for creating ebooks from single pdf files)
29. Guitar Pro (for creating lesson plans and sheet music for ebooks)
30. Quickbooks Self Employed (Used for Invoicing students’ parents every half term and for forwarding email receipts to record them in Quickbooks. It is basic, but it suits my needs.)
I do most of my work from a desktop computer. It’s pretty old school I know but actually I like sitting down at the desk and getting immersed and then being able to walk away and leave it, rather than have the temptation of trying to work on the sofa (I know some people that prefer the sofa though!). I keep my mobile contract slim and use a cheap to mid range phone, which is a smart phone, but it doesn’t cost loads.
My bookkeeping, teaching schedules, invoices, paid lists, have all been done using my own system of documents and spreadsheets that are quite refined and easy to use for my business now. I have recently moved onto Quickbooks Self Employed for invoices, which has made writing and sending them easier. My process to record payments for school lessons used to be to input it into a spreadsheet, then copy and paste into a ‘paid’ documents file for each given half term and school, and delete the pupil’s name that has been paid for. I would then check who still needs to pay. My invoices use a template I made and I had a copy of that in the same folder as the paid file for each half term and school name. The invoices always include payment info and at the top of that list is bank transfer details because that form of payment has the least admin for me. I then export that as a pdf file and email the parents at the start of a half term. Mostly I have to make different ones for each half term and ammend for different pupils if they have missed lessons or have not paid for a half term.
I also have a spreadsheet of all of my pupils in each school and their instrument and time details, and rows of checkboxes so I can print them off and use them as a rota for the half term. In high schools the rotas need to have time slots added to the rota. For primary schools, they are too hectic and unpredictable to make rigid timetables for, so I don’t bother. At the start of a new half term, I will copy over all the files from the previous half term and begin editing them for the next one. Usually the amount of weeks per half term changes so there is always something to change. I leave an extra list of pupils per school in the paid files so that I can copy them into a fresh ‘unpaid’ area below, and then I can delete them off as they pay.
I keep an up to date copy of parents’ email addresses in Google contacts and group them into different schools and also give them instrument tags incase I need to email all of the guitarists for something at once. I always try to email the parents using the bcc send field, and this is easy on a computer with a mouse because you can select all the contacts from google contacts, and click to send email, then drag all the addresses into the bcc field. I also have a mailchimp list but it’s not easy to keep that updated as well so I tend not to use it. I do for my website subscribers though.
For my websites www.learndrumsforfree.com and www.learnguitarforfree.com most of the files are hosted on the websites. I learned how to make websites before starting to teach, which has really given me the tools to build an online business too. I learned html and css using an O’Reilly book and the rest followed from there. Actually it all started from the coding features on myspace when bands could change the styles on their pages and adding in banners etc. My sister does web design and artwork in the music industry and she said that probably started her off too, or gave her the coding bug. I use dreamweaver to edit code because the colours are useful, but other free ones are available, and filezilla for ftp file transferring.
I use payhip for all of my pdf ebooks, which is the best I have found. It links to paypal for payments and it has just added a feature to automatically add customers to mailchimp lists. People that download free ebooks are added to my regular subscriber list for upadtes of free blog posts, and paying customers are added to a special list, which I send info of new ebook products to when they are released. Bandcamp is used in a similar way for audio and music, although their mailing list integration is not as good so I can’t really use that effectively at the moment unless I set up more accounts and then export email addresses to the appropriate subscriber lists.
I have found that social media is pretty much a waste of time for my online business at the moment but the mailing list is great, and actually pinterest generates the most hits, so I do chose to get rid of all but the pinterest. It’s all about finding what works for your business and choosing the right platforms to get the most out of your time and effort.
I get many hits per day on both sites quite often and almost all the traffic is organic from search engines. It’s taken years to build up so it really is a lot of hard work but adding to it “little and often” really helps build up a huge site over time. Most of my ebook sales follow searching for free stuff from organic google searches and then discovering the ebooks. I believe this is called a “fremium” business model. When I launch a new ebook and send it to my paying customers mailing list, I usually get quite a few sales from them, so that is really useful for me and them.
Hopefully this gives gives you ideas for your own online business. I tried in the past setting up my own ubercart shopping cart and hosting everything myself, but I had to switch to payhip due to new EU tax rules on digital products. It was too hard to manage myself but payhip and bandcamp both sort sll this out for you. For every ebook sale, payhip takes off the tax, which is different depending on each country, from the money I receive, so they literally take care of everything without me needing to register to pay tax in every country. It completely took the hassle away from thiose new laws.
I also make music and play in a band so I have an unlimited ditto music subscription to release to spotify and itunes etc. whilst bandcamp is the best, not all customers are used to that so you kind of have to make things available where the customers are.
Guitar Pro is the best in my opinion! I’ve tried Sibelius but that’s probably only better for orchestral stuff. Guitar Pro is amazing for most instrumentsl sheet music writing, including guitar, drums, ukulele, bass and even instruments such as flute and piano. I always use it for all of my sheet music. I even use it to export midi to Abelton sometimes, rather than using the piano roll to input midi.
Abelton has been great for making music from midi, recording my own music, making backing tracks, and for teaching other music production. The education price helped me to buy it. Landr is a quick, easy and cheap way to finish off tracks so they are ready to release. The mastering is pretty good. I subscribe for a month and then cancel it when I am done.
All of the chaos that is my schedule is fairly organised with Remember The Milk and Google Calendar. Both can set tasks and appointments to repeat weekly or as often as needed, which is really useful. I use both services on the desktop and synced to my phone. My email is also really important for my business. I sometimes send emails to myself with important TO DO list items for that day, so I can’t possibly miss them.
Contains information related to marketing campaigns of the user. These are shared with Google AdWords / Google Ads when the Google Ads and Google Analytics accounts are linked together.
90 days
__utma
ID used to identify users and sessions
2 years after last activity
__utmt
Used to monitor number of Google Analytics server requests
10 minutes
__utmb
Used to distinguish new sessions and visits. This cookie is set when the GA.js javascript library is loaded and there is no existing __utmb cookie. The cookie is updated every time data is sent to the Google Analytics server.
30 minutes after last activity
__utmc
Used only with old Urchin versions of Google Analytics and not with GA.js. Was used to distinguish between new sessions and visits at the end of a session.
End of session (browser)
__utmz
Contains information about the traffic source or campaign that directed user to the website. The cookie is set when the GA.js javascript is loaded and updated when data is sent to the Google Anaytics server
6 months after last activity
__utmv
Contains custom information set by the web developer via the _setCustomVar method in Google Analytics. This cookie is updated every time new data is sent to the Google Analytics server.
2 years after last activity
__utmx
Used to determine whether a user is included in an A / B or Multivariate test.
18 months
_ga
ID used to identify users
2 years
_gali
Used by Google Analytics to determine which links on a page are being clicked
30 seconds
_ga_
ID used to identify users
2 years
_gid
ID used to identify users for 24 hours after last activity
24 hours
_gat
Used to monitor number of Google Analytics server requests when using Google Tag Manager